Boktai 1 Normal 2 Any%
About this Guide
This Guide is intended for the Japanese version of Boktai: The Sun is in your Hands and the Normal 2 Any% Category. It should work exactly the same for other languages but JP is significantly faster.
Credits go to the entire Taiyoh Network Community and many casual players that discovered strategies on accident.
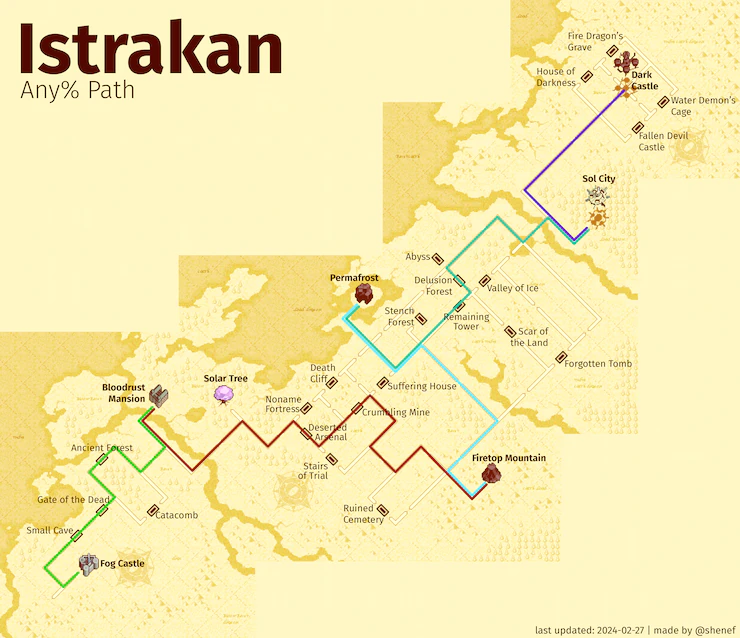
Map
Videos
Some sections have videos attached that show that section being played. Watch those videos for chests, pathing and enemies that need to be killed as that will be omitted from the text description. If a section has no video, there will be no chests you need and every enemy is a mandatory kill.
The strategies shown in the videos are ideal scenarios, don't worry if a trap or boss fight doesn't work out exactly as shown.
When there are route updates, there can be small differences like inventory item order or amount that may not be worth updating a video.
Generally, if you pick up the same chests and kill the same enemies, you should be fine.
Solar Gauge
A recommendation on which sun strength to use for that dungeon to prevent overheat and ensure you reach the required dungeon rank where necessary.
For purifications you can ignore that recommendation and always go for max.
Before the run
Check the Leaderboard rules to make sure your run will be valid!
If you want to play on an emulator, currently only mGBA and BizHawk are allowed.
In the case of BizHawk, you should use at least version 2.6.3 since that adds the ability to emulate an empty cartridge battery.
- BizHawk: GBA > Settings > Sync Settings:
- Set “Skip BIOS” to “False”
- Set “RTC use Real Time” to “False”
- Set “RTC” to “False”
- mGBA:
- TODO: instructions on how to set up empty battery
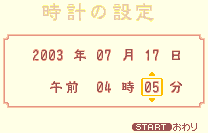
 Then in-game, set the Date and Time to
- 2003 年 07 月 17 日
- 午前 04 時 05 分
With this starting time you will
- get Ghouls instead of Spiders outside Fog Castle,
- get better enemies in Firetop Mountain,
- skip the Night to Day cutscene if you are fast enough to get it between Firetop and Permafrost,
- reach Delusion Forest during the early morning.
Optional on Emulator: Increase the Light on the Start Screen (visualized by Sun animation speed)
To start a new run
- create a new save file,
- reduce the name to one character,
- keep the default region setting,
- keep the default difficulty (Normal 2),
- start the timer when confirming on the Summary Screen.
Route
Intro
Once you gain control, pause the game and set the text speed to “Fast”.
Optionally you can also turn off markers which can slightly reduce lag.
Inputs needed to change the text speed and disable the markers:
- start, ↓, ↓, A, ↓, →, ↓, →, A, B
Text speed saves about 3-4 seconds, for markers we don't have data.
Fog Castle 
Do not run out of Energy in the bat room or the chest will not spawn.
Small Cave 
Need S-Rank, you cannot be seen more than once.
Gate of the Dead 
TODO
Ancient Forest 
Trap: Do not let the Golems kill each other!
Bloodrust Mansion 
For the Count fight increase Sun to 8, then keep it at 8 to ensure S-Rank.
- Garden puzzle numbers: 3 > 9 > 8 > 6 > 5 (best to worst)
- Time Puzzle: 7, 9, 10, 1, 3, 5, 8
Solar Tree 
Talk to Lita, plant a single Green Apple (A, start, A).
Alternative, not properly tested, strategy: Plant a Gold Apple. The idea is that if you have very good Sunlight management, you will never get the "plant is grown" message.
Deserted Arsenal 1
TODO
Deserted Arsenal 2
TODO
Crumbling Mine
TODO
Firetop Mountain
TODO
Permafrost
TODO
Remaining Tower 1
TODO
Delusion Forest
TODO
Sol City
Chicken Trap has 5 Speednuts and 5 Bananas
Crusader Frame
TODO
Flame Tower
TODO
Earth Tower
TODO
Frost Tower
TODO
Cloud Tower
TODO
Central Tower
TODO
Sabata
Phase 1
TODO
Phase 2
TODO
Hel
Phase 1
TODO
Phase 2
TODO
Lens Exp Routing
| Location | Sol | Frost | Notes | ||
|---|---|---|---|---|---|
| Delta | Total | Delta | Total | ||
| Fog Castle | +3 | 3 | 1 Bok * 3 EXP | ||
| Fog Castle Bats | 3 | No exp | |||
| Fog Castle Exit | +3 | 6 | 1 Bok * 3 EXP | ||
| Fog Castle Purification | +100 | 106 | |||
| Small Cave | +3 | 109 | 1 Bok * 3 EXP | ||
| Small Cave Trap | 109 | No exp | |||
| Gate of the Dead | 109 | ||||
| Gate of the Dead Trap | +30 | 139 | 1 Sword * 10 EXP + 20 | ||
| Ancient Forest | 139 | ||||
| Ancient Forest Trap | +40 | 179 | 4 Golems * 5 EXP + 20 | ||
| Bloodrust Mansion | +3 | 182 | 1 Bok * 3 EXP | ||
| Count Battle | +50 | 232 | |||
| Bloodrust Mansion Exit | +3 | 235 | 1 Bok * 3 EXP | ||
| Count Purification | +50 | 285 | |||
| Deserted Arsenal Trap | +70 | 355 | 1 Sword * 30 EXP + 40 | ||
| Deserted Arsenal Trap | +70 | 425 | 1 Sword * 30 EXP + 40 | ||
| Crumbling Mine Trap | +80 | 505 | 4 Mummies * 10 EXP + 40 | ||
| Firetop Mountain | 505 | ||||
| --- Need Sol Lv2/500 EXP here --- | |||||
| Muspell Battle | +150 | 655 | Always gives 150 EXP | ||
| Muspell Purification | +150 | 805 | |||
| Permafrost | 805 | ||||
| Garmr Battle | +150 | 955 | Always gives 150 EXP | ||
| Garmr Purification | +150 | 1105 | |||
| Delusion Forest | 1105 | +60 | 60 | ||
| Sol City Traps | 1105 | +87 | 147 | 3 Chickens * 29 EXP; 2nd trap gives no EXP??? | |
| Sol City | 1105 | +30 | 177 | 1 Golem * 30 EXP | |
| Carmilla Battle | 1105 | +300 | 477 | ||
| Carmilla Purification | +300 | 1405 | 477 | ||
| Flame Tower | 1405 | +27 | 504 | 3 Boks * 9 EXP | |
| --- Need Frost Lv2/500 EXP here --- | |||||
| Muspell 2 | +100 | 1505 | 504 | If you don't get the Sol Lens kill, kill 4 chickens in Cloud Tower | |
| Earth Tower | 1505 | 504 | |||
| Count 2 | +100 | 1605 | 504 | ||
| Frost Tower | +36 | 1641 | 504 | 4 Boks * 9 EXP (from RSG at start) | |
| Garmr 2 | +100 | 1741 | 504 | ||
| Cloud Tower | 1741 | 504 | |||
| Carmilla 2 | +100 | 1841 | 504 | ||
| Dark Castle Trap | +150 | 1991 | 504 | 10 Tentacles * 15 EXP | |
| Dark Castle | +9 | 2000 | 504 | 1 Bok * 9 EXP | |
| --- Need Sol Lv3/2000 EXP here --- | |||||
| Sabata Phase 1 | +200 | 2200 | 504 | ||
| Sabata Phase 2 | +300 | 2500 | 504 | ||
