Boktai Guides and Resources
This is the central collection of Guides and Resources of the “Taiyoh Network” Boktai Speedrunning Community.
It is segmented into two main parts, a Guides section and a Resources section.
Guides:
Resources:
If you want to contribute, feel free to join our Discord and/or to create pull requests or issues on GitHub.
You can also check out the Writing a guide page for a few tips on contributing.
Boktai 1
Guides
Resources
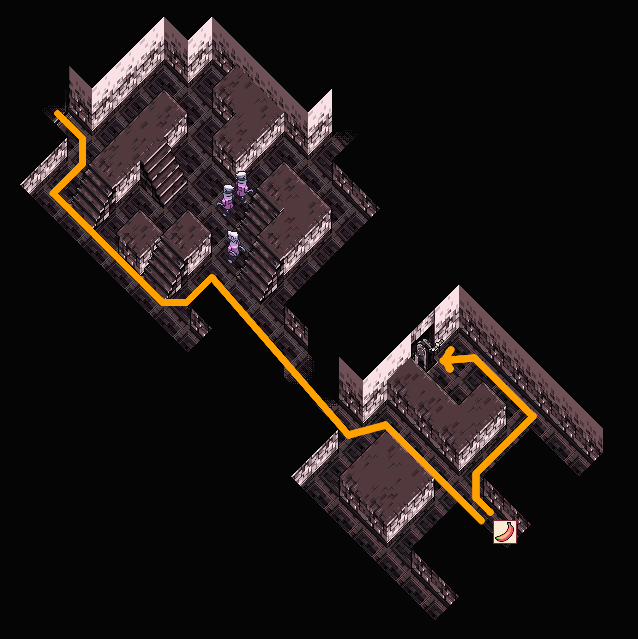
Boktai 1: Any% Route
Important
This guide is currently being rewritten because of route improvements.
Feel free to contribute on Discord or on the GitHub repository.
 Click for full size
 About this Guide
This Guide is intended for the Japanese version of Boktai: The Sun is in your Hands and the Any% Category at the Normal 2 difficulty. It should work exactly the same for other languages but JP is significantly faster.
Credits go to the entire Taiyoh Network Community and the many casual players that found strategies we use today.
Videos
Some sections have videos attached that show that section being played. Watch those videos for chests, pathing and enemies that need to be killed as that will be omitted from the text description. If a section has no video, there will be no chests you need and every enemy is a mandatory kill.
The strategies shown in the videos are ideal scenarios, don’t worry if a trap or boss fight doesn’t work out exactly as shown.
When there are route updates, there can be small differences like inventory item order or amount that may not be worth updating a video.
Generally, if you pick up the same chests and kill the same enemies, you should be fine.
Solar Gauge
A recommendation on which sun strength to use for that dungeon to prevent overheat and ensure you reach the required dungeon rank where necessary.
For purifications always use the highest possible solar gauge level.
Terminology
- Stun
- Shooting an enemy in the back with a sufficiently strong frame will cause it to be stunned for several seconds. Stunned enemies have no hitbox, and can’t see you.
- Detection
- An enemy detects you if a red exclamation mark appears above the enemy. Being detected increases the “being found” counter on the dungeons result screen, which reduces your dungeon rank and therefore the reward(s) you receive after completing the dungeon. White or blue exclamation marks do not count as detections. Enemies in traps never detect you.
General instructions
- Ignore every enemy unless the guide instructs you to do otherwise. The guide will tell you if there is a limit on how often you can get detected in a dungeon.
- Pick up every item marked on the maps. Many of these will be in invisible chests. You can open invisible chests by pressing A, just like normal chests.
- While picking up healing items (like apples) is optional, skip them at your own peril.
- Use healing items as necessary.
- Hold B to clear text boxes optimally. Mash A/B to clear undead dungeon intros. Mash A/Start to clear immortal dungeon intros. Mash A/B to clear dungeon result screens.
- You can (and should) cut corners on every staircase, both at the top and at the bottom. This saves time, and allows you to sneak past some enemies.
Before the run
Check the Leaderboard rules to make sure your run will be valid!
If you want to play on an emulator, currently only mGBA and BizHawk are allowed.
In the case of BizHawk, you should use at least version 2.6.3 since that adds the ability to emulate an empty cartridge battery.
- BizHawk: GBA > Settings > Sync Settings:
- Set “Skip BIOS” to “False”
- Set “RTC use Real Time” to “False”
- Set “RTC” to “False”
- mGBA:
- TODO: instructions on how to set up empty battery
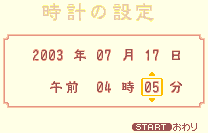
Then in-game, set the Date and Time to
- 2003 年 07 月 17 日
- 午前 04 時 05 分
With this starting time you will
- get Ghouls instead of Spiders outside Fog Castle,
- get better enemies in Firetop Mountain,
- skip the Night to Day cutscene if you are fast enough to get it between Firetop and Permafrost,
- reach Delusion Forest during the early morning.
Optional on Emulator: Increase the Light on the Start Screen (visualized by Sun animation speed)
To start a new run
- create a new save file,
- reduce the name to one character,
- keep the default region setting,
- keep the default difficulty (Normal 2),
- start the timer when confirming on the Summary Screen.
Intro
Once you gain control, pause the game and set the text speed to “Fast”.
Inputs needed to change the text speed:
- start, ↓, ↓, A, ↓, →, A, B
Text speed saves about 3-4 seconds.
Fog Castle 
| Resource | Start with | Get | Consume | End with |
|---|---|---|---|---|
| Sol Lens EXP | 0 | +106 | 106 | |
| Speed Nut | 0 | +5 | -1 | 4 |
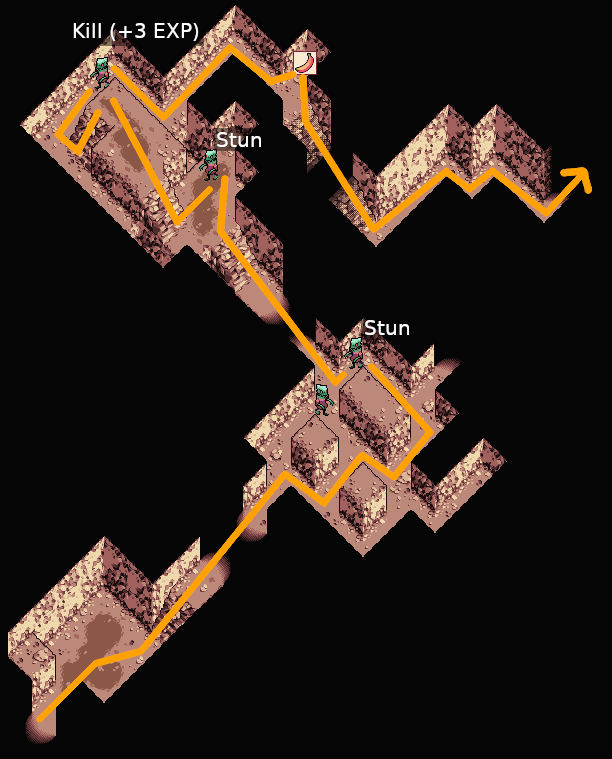
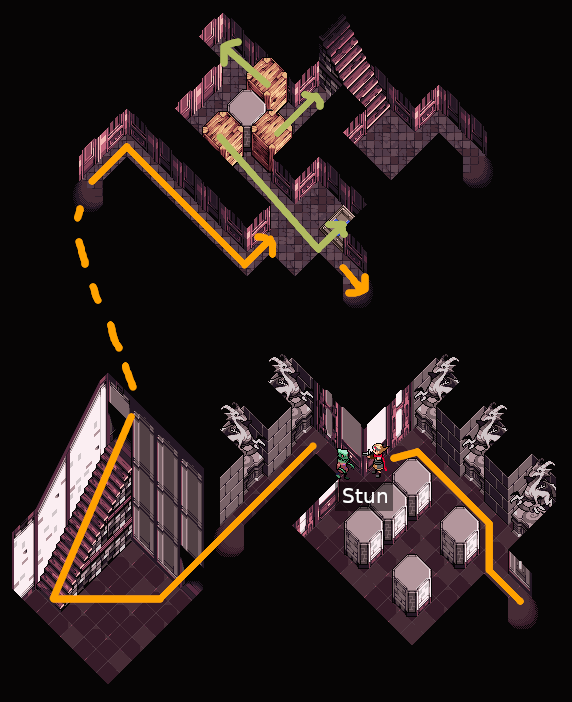
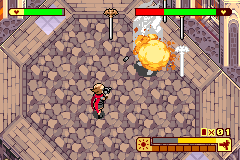
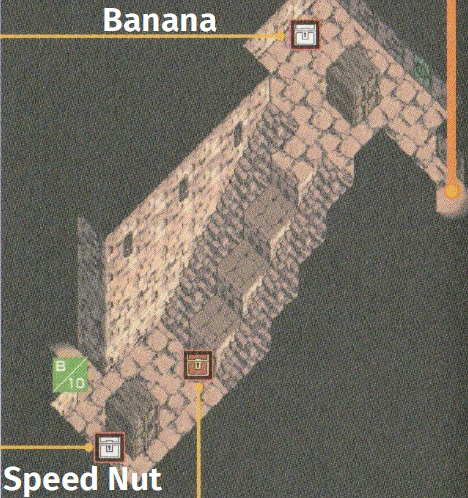
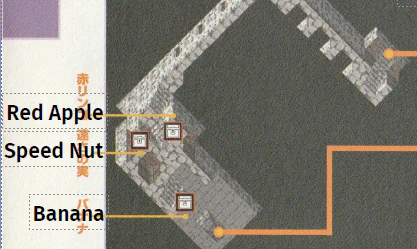
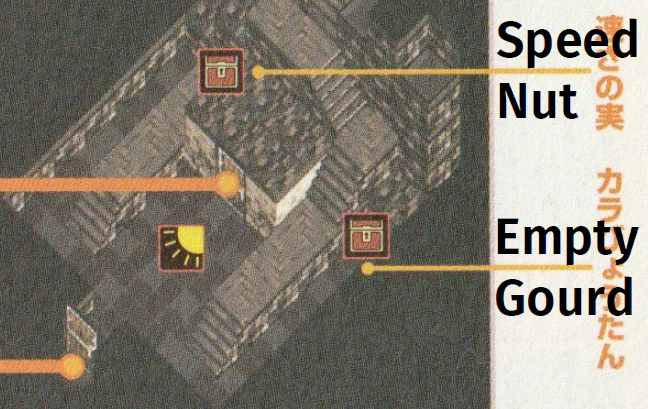
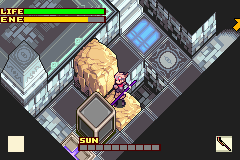
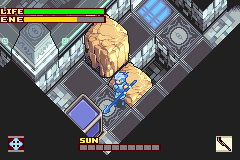
Follow the only path through this dungeon. Pick up the Knight Frame from the green chest on the way, and equip it immediately. Kill the Bok in the next room by hitting it with 3 ticks of your guns spread.
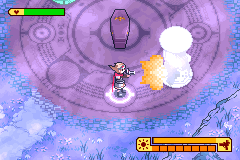
Kill all bats in the coffin room without running out of energy. This spawns a chest containing ![]() 5 Speed Nuts. Then drag the coffin back out.
5 Speed Nuts. Then drag the coffin back out.
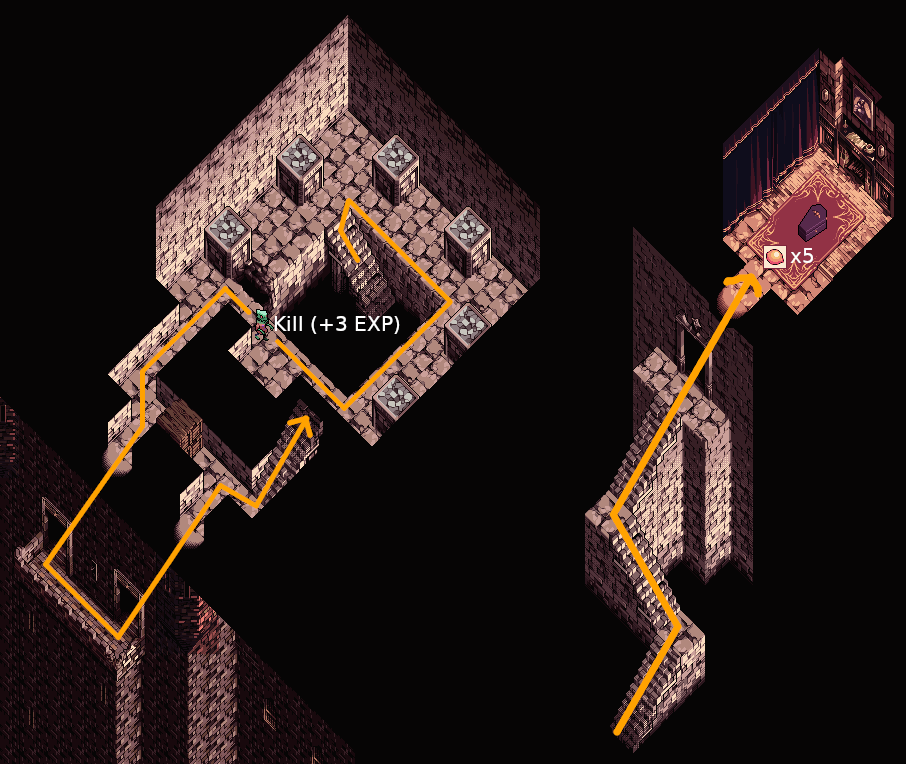
When the coffin starts shaking in this hallway, drop the coffin, kill the stationary Bok near the skylight (+3 EXP), and knock on the wall behind the skylight. The second Bok will move into the skylight and die, allowing you to drag the coffin out unimpeded:
Purification
First, charge the left tower of the pile driver. Then charge the right tower by standing on the pile driver activation spot. After charging that tower, press A immediately to start the purification, skipping a text box:
The basic strategy for purifications is:
- Evade the immortal’s attacks (there won’t be any attacks during this purification).
- If one of the Solar Piles is not at full power (= the ray is partially dark), spread at the corresponding generator until it’s back at full power. Not having all piles at full power significantly increases the time required for purification.
- Otherwise, spread at the coffin.
Use a ![]() Speed Nut just before completing the purification (+100 EXP). When the screen with the Boktai logo appears, mash A/B to clear it.
Speed Nut just before completing the purification (+100 EXP). When the screen with the Boktai logo appears, mash A/B to clear it.
Small Cave 
| Resource | Start with | Get | Consume | End with |
|---|---|---|---|---|
| Sol Lens EXP | 106 | +3 | 109 | |
| Speed Nut | 4 | +3 | -1 | 6 |
| Banana | 0 | +1 | 1 |
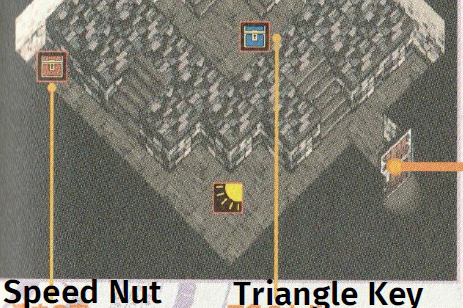
You must get an S-rank in this dungeon. This requires at most one detection, and ideally your one detection is from the last Bok just before the door to the trap.
Before getting the key, stun the enemy to the north. Do this by entering the door to the key while holding right, and immediately firing a shot once you emerge in the big room. Then get the ![]() Triangle Key from the chest and go to the trap, while avoiding detections by the Boks.
Triangle Key from the chest and go to the trap, while avoiding detections by the Boks.
You should charge your energy to full on the skylight while waiting for the Bok on the right to turn away.
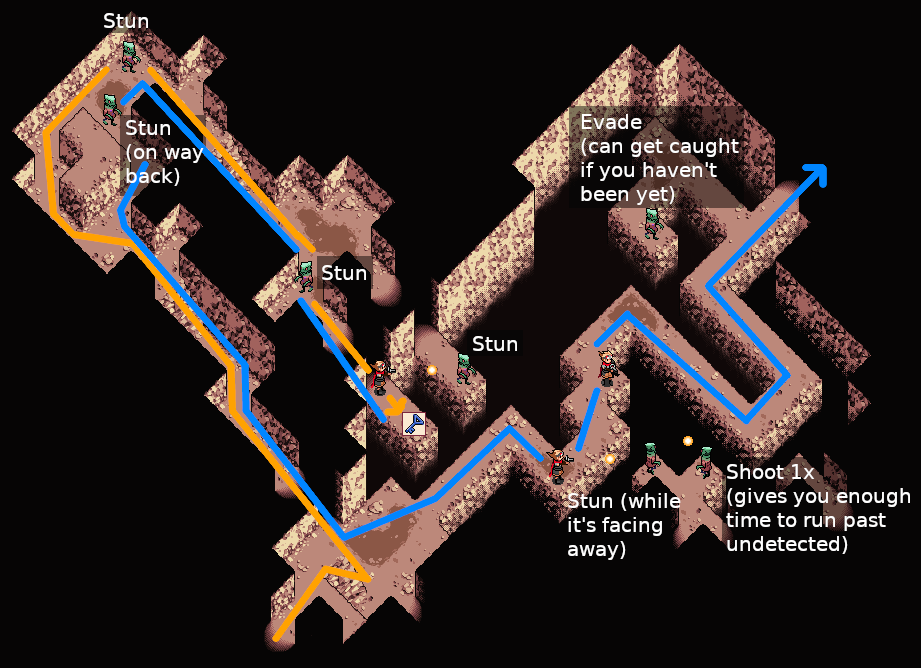
Clear the trap. If you S-ranked this dungeon, you will receive a reward chest with ![]() 3 Speed Nuts. Use a
3 Speed Nuts. Use a ![]() Speed Nut before leaving the dungeon.
Speed Nut before leaving the dungeon.
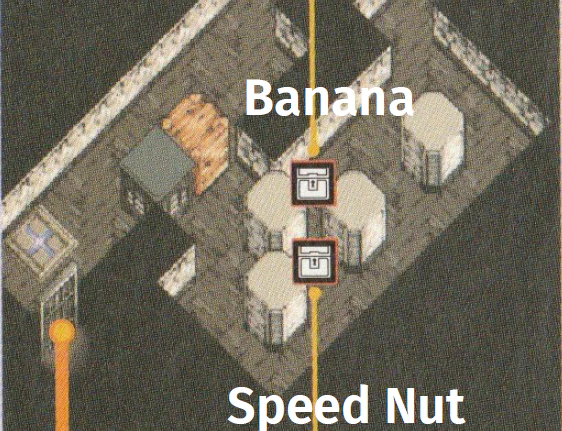
Gate of the Dead
| Resource | Start with | Get | Consume | End with |
|---|---|---|---|---|
| Sol Lens EXP | 109 | +30 | 139 | |
| Speed Nut | 6 | -1 | 5 | |
| Banana | 1 | +3 | 4 |
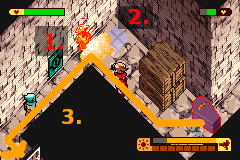
You must get an S-rank in this dungeon. You cannot be detected at all. In the first room, stun the right Bok by firing 9 shots at it from the bottom of the room. Because you’re out of its vision range here, it will not see you:
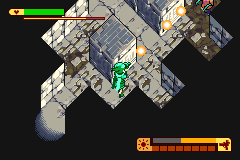
The other enemies in this dungeon require no interaction. Their vision range is too short to detect you:
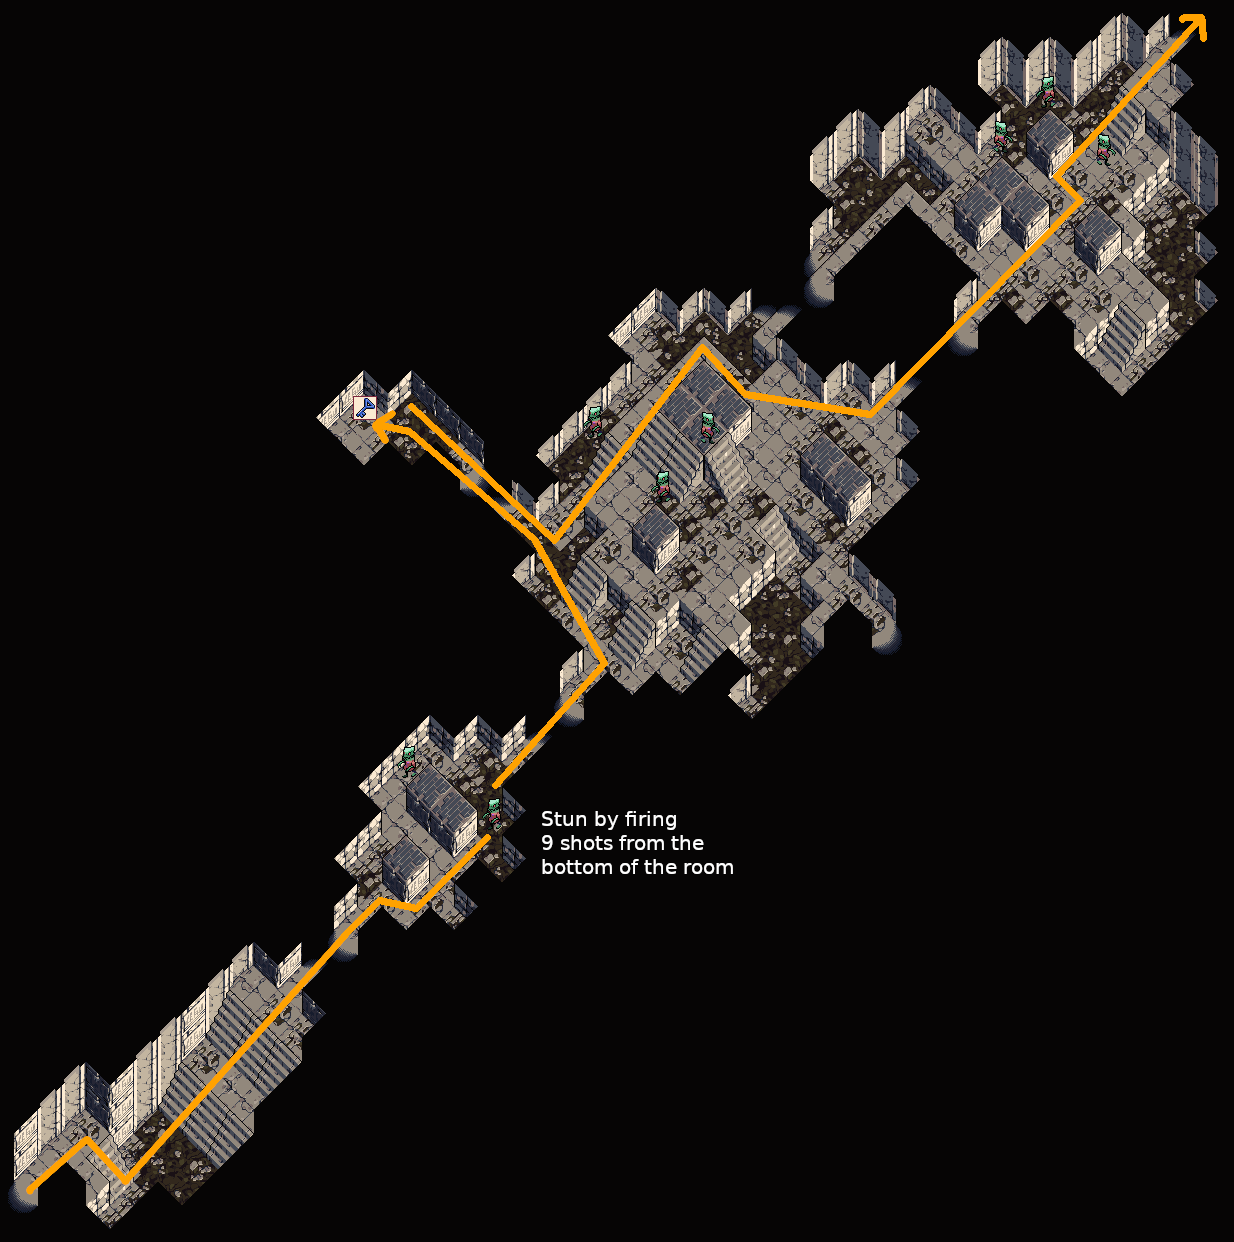
Trap
Use your guns spread to defeat the Sword. Try to reflect the small swords back into the big sword to speed up the fight. To conserve energy don’t fire the spread continuously, but let go of the B button while the sword is invincible between your attacks.
Clear the trap (+30 EXP), open the reward chest containing ![]() 3 Bananas, and use a
3 Bananas, and use a ![]() Speed Nut before leaving the dungeon.
Speed Nut before leaving the dungeon.
Ancient Forest 
| Resource | Start with | Get | Consume | End with |
|---|---|---|---|---|
| Sol Lens EXP | 139 | +40 | 179 | |
| Speed Nut | 5 | -1 | 4 |
There is no required rank in this dungeon, so there’s no limit on how often you can be detected.
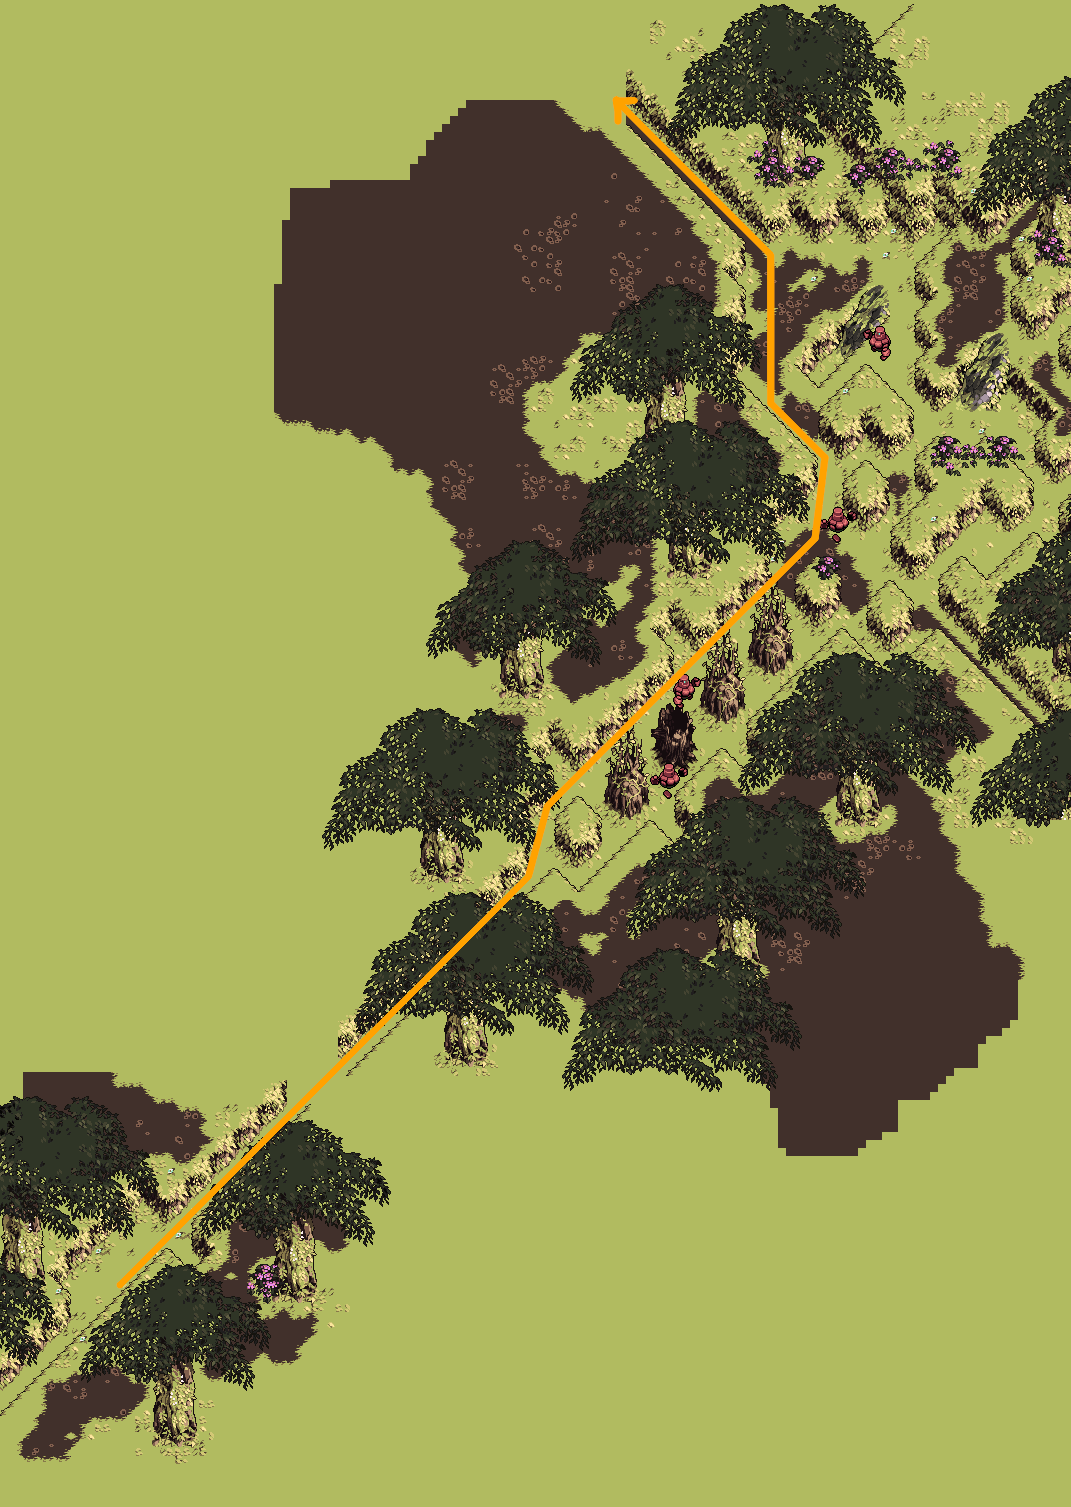
The only item you have to pick up is the Spear Frame from the green chest. Equip it before entering the trap. Ignore all other chests.
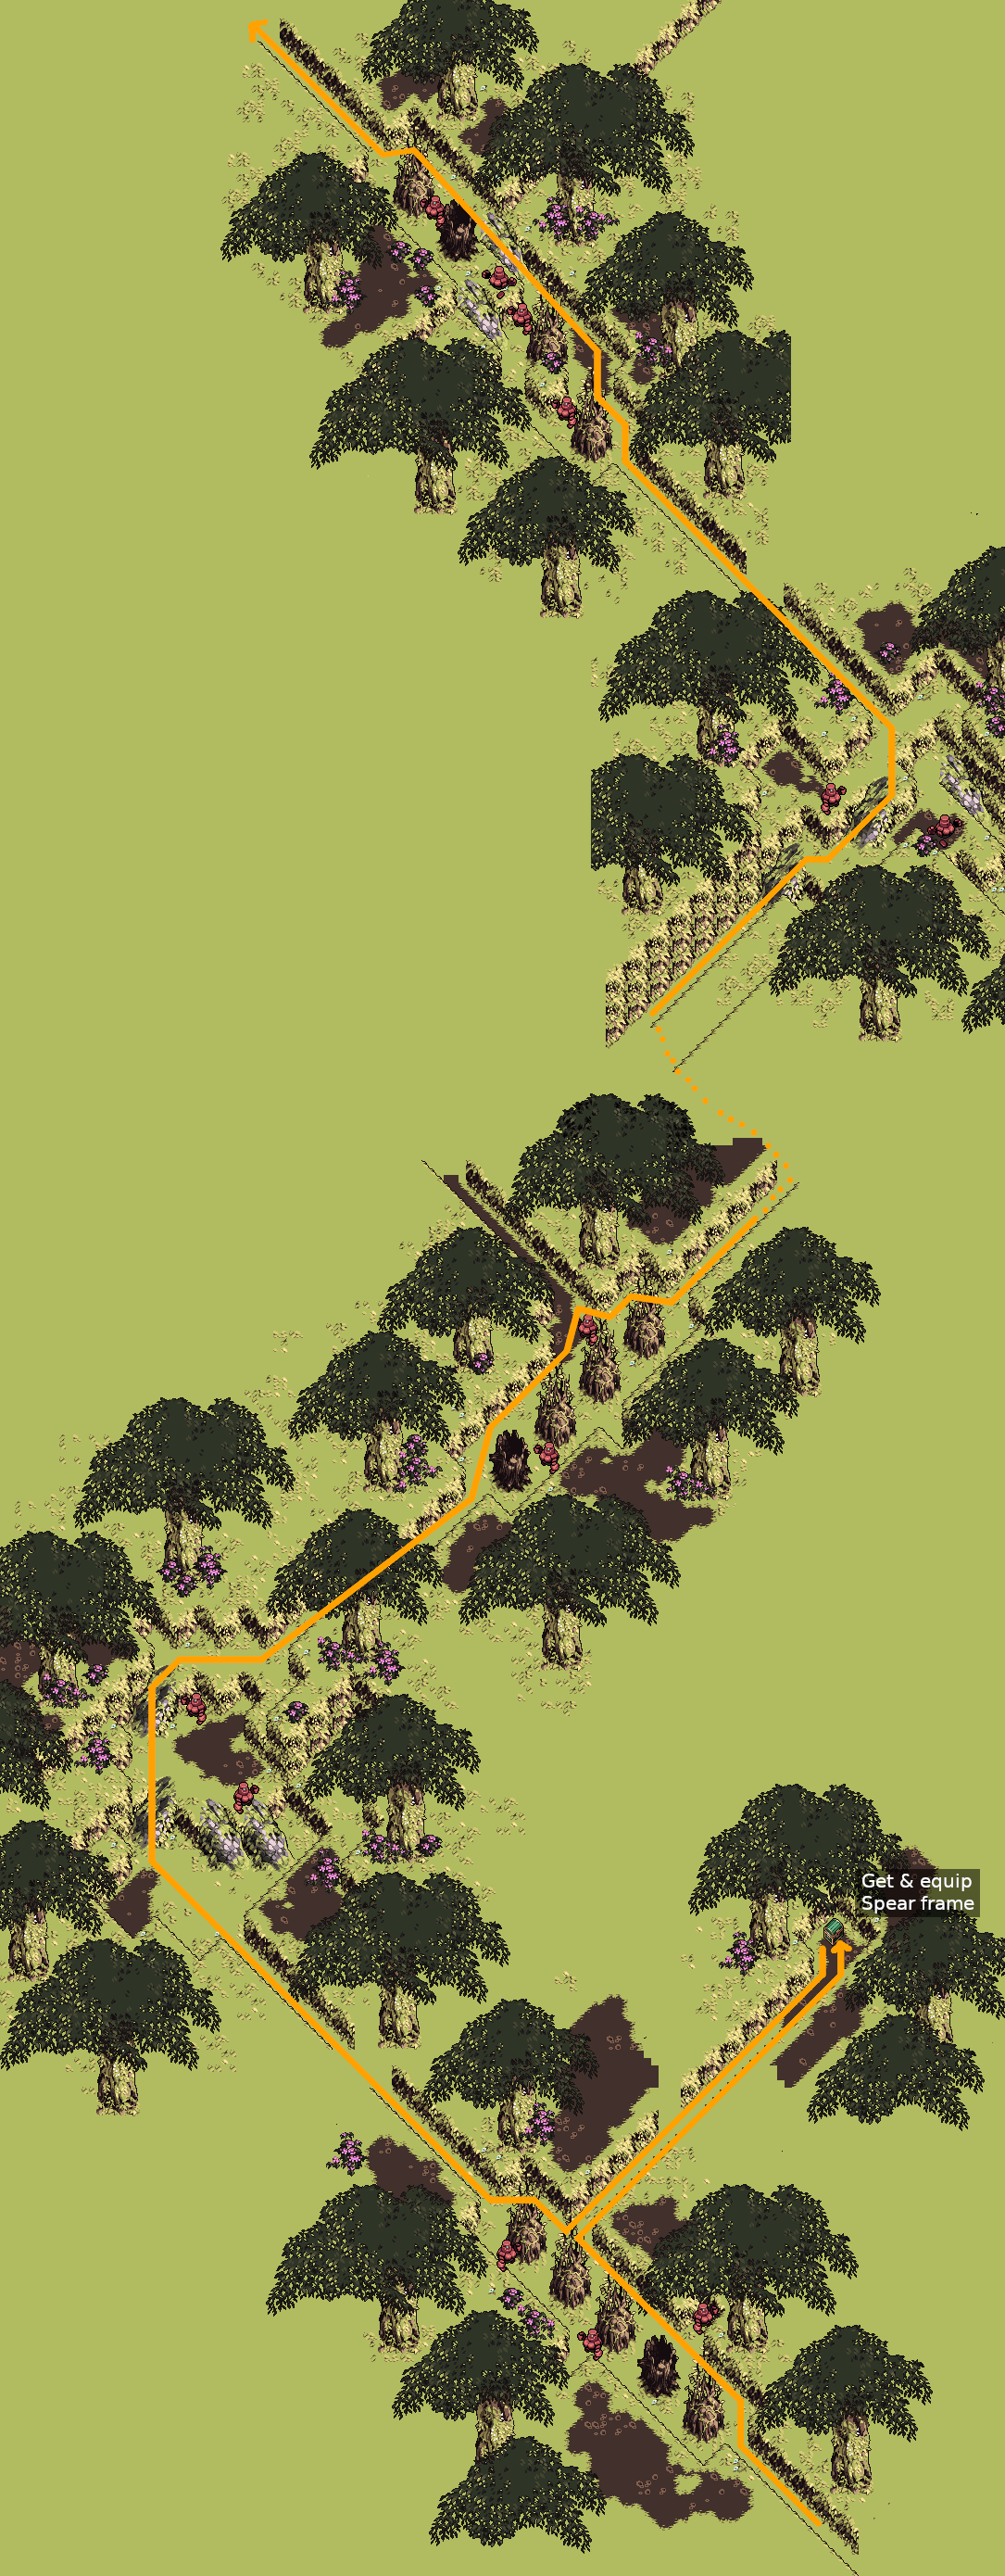
Trap
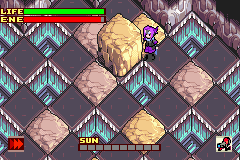
Walk over the puddle and back as indicated to attract the Golems. Once they are in your line of fire, knock them away with the Spear Frame. By doing this, all Golems will be stunned and bunched up at the same spot, and you can kill them at the same time:
Do not let the golems kill each other. If they do, you’ll be short 5 EXP for every Golem that didn’t die from your gun. In that case, you’ll need to kill extra enemies later in the run (before Sabata in Dark Castle) to make up the missing EXP. Any Golem, Mummy, and Cockatrice-type enemy will give at least 5 EXP, as will any Bok except for the green ones.
Clear the trap (+40 EXP), skip the reward chest, and use a ![]() Speed Nut before leaving the dungeon.
Speed Nut before leaving the dungeon.
Bloodrust Mansion 
| Resource | Start with | Get | Consume | End with |
|---|---|---|---|---|
| Sol Lens EXP | 179 | +109 | 288 | |
| Speed Nut | 4 | +5 | -3 | 6 |
| Banana | 4 | +2 | -6 | 0 |
| Bomb | 0 | +4 | -3 | 1 |
| Evil Banana | 0 | +3 | 3 |
Avoid getting seen, because you must S-rank this dungeon.
Get the circle key by pushing the top-most block left:
After your Speed Nut expires, use a ![]() Banana for the box push puzzle, then use 2
Banana for the box push puzzle, then use 2 ![]() Speed Nuts.
Speed Nuts.
Make sure to pick up the Double Battery from the green chest, but don’t equip it yet. The spiders in the next room are unable to detect you, and only the red spiders have a hitbox at all.
In the next room, step on these pressure plates in order to open the staircase, and go downstairs:
7, 9, 10, 1, 3, 5, 8

Use a ![]() Banana to solve the next box push puzzle, then use one more
Banana to solve the next box push puzzle, then use one more ![]() Speed Nut.
Speed Nut.
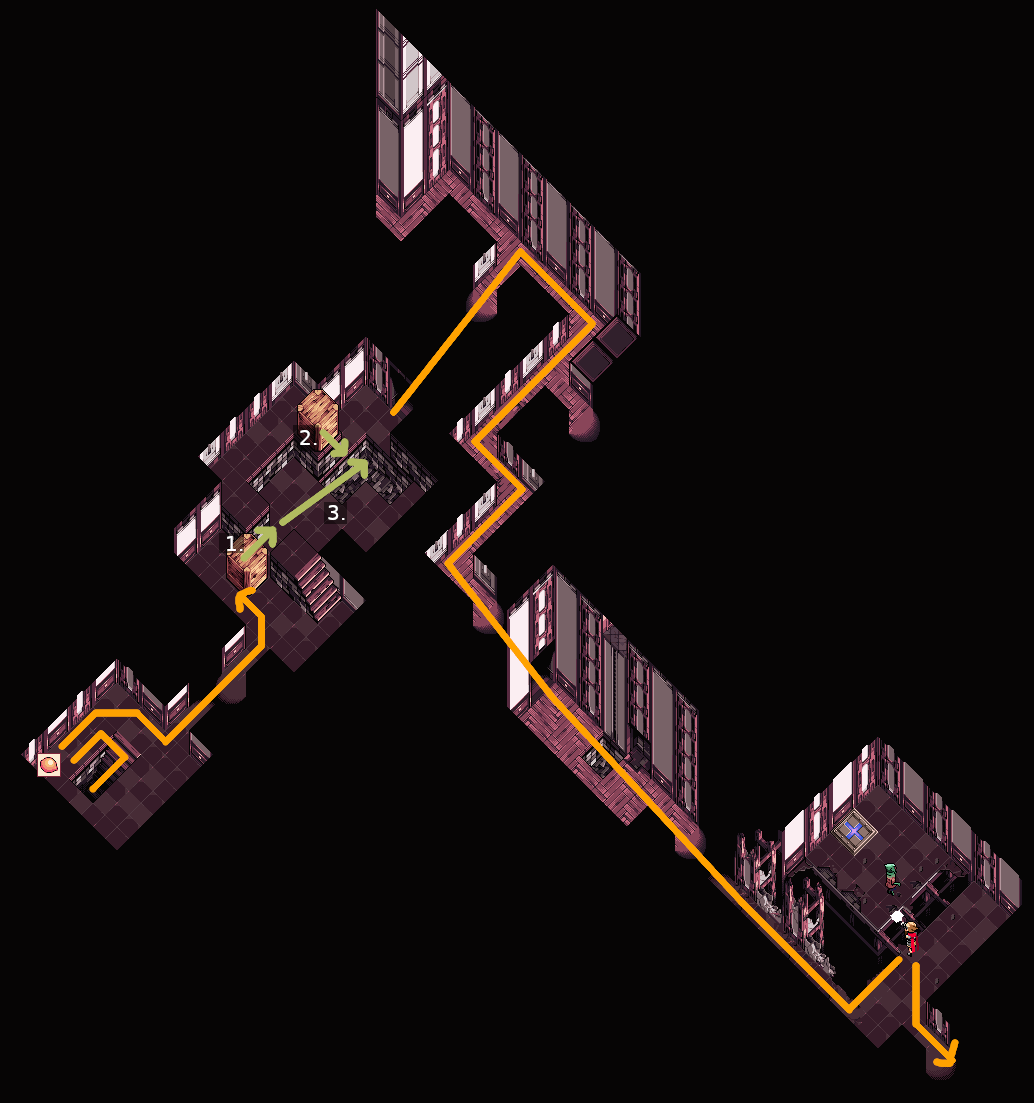
You can push the Bok onto the pressure plate by setting up a back attack. Use the floor tiles as a visual reference:
- Position Django on the light floor tile
- Wait until the Bok steps onto the 3rd row of floor tiles
- Fire a shot at the Bok, this will knock it onto the pressure plate:
Backup strat: Use Knight Frame + Luna Lens.
In the room with the Vaniboks, it’s OK to get detected once on each visit.
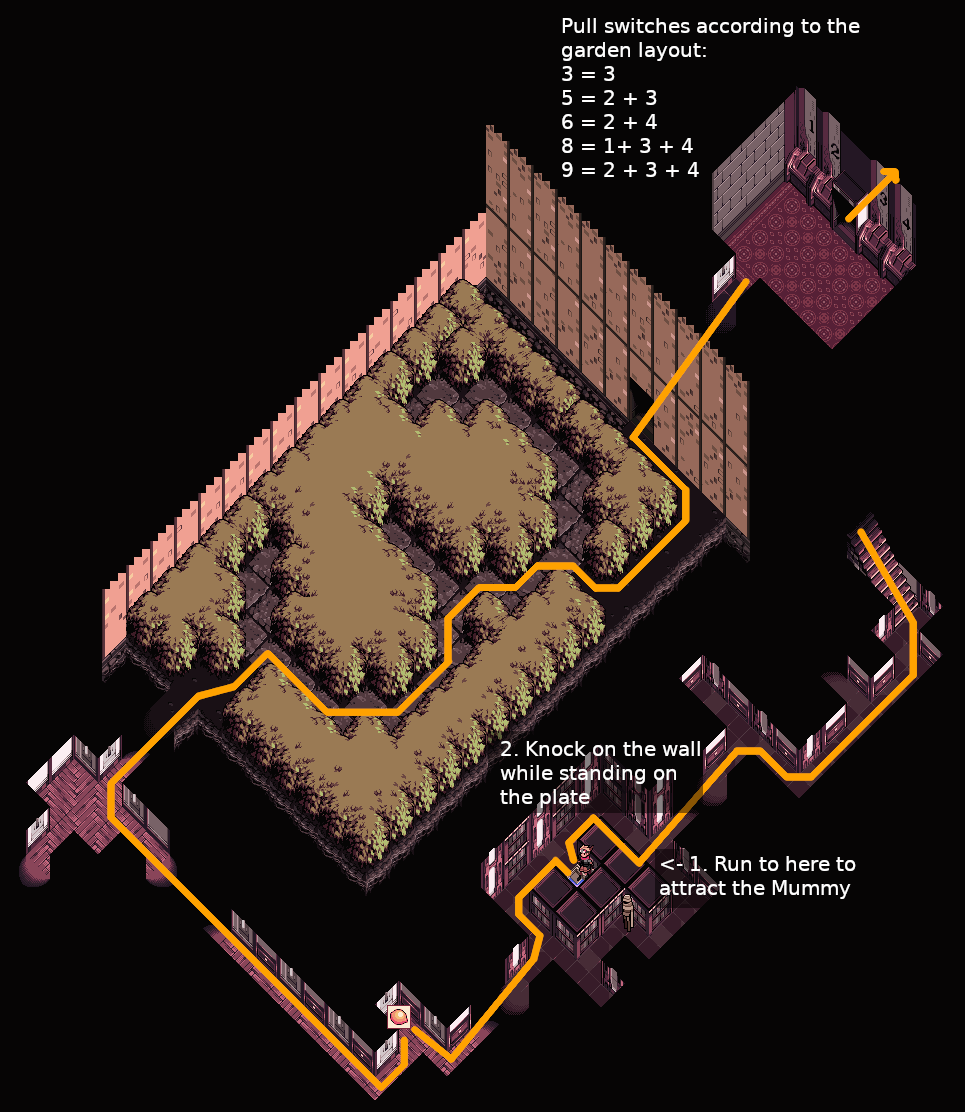
Flip the lever and go back to enter the next puzzle where you must place two Boks onto the pressure plates at the same time to unlock the exit. To solve this puzzle quickly:
- Knock on the pillar near the entrance to attract both Boks.
- Sneak up behind the lower Bok and follow it.
- Once that Bok turns right, fire a shot to stun it and knock it onto the pressure plate simultaneously.
- Stand on the upper pressure plate and knock on the pillar to attract the upper Bok.
- Hide and wait for the door to open.
Note
Click to open video
This requires some practice, if you’re not fast enough then the upper Bok will spot you. The strategy works without a Speed Nut active.
Backup strat: Use Knight Frame + Sol Lens to stun the Boks, and Luna Lens to knock them around.
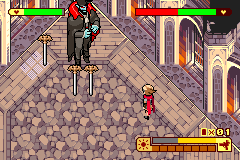
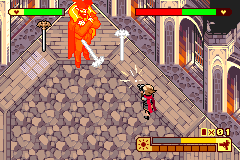
For the Count fight increase Sun to 8, then keep it at 8 for the remainder of the dungeon to ensure S-Rank. Equip the bombs, and ensure you have the Sol Lens and Spear Frame equipped.
The Count
- Start the fight by mashing L until you have thrown 3 bombs.
- Wait for the count to start moving, then position yourself on the stone floor to the south of the center window.
- Wait for the count to throw a sword at you, and shoot to knock it back at him (you can shoot the sword as soon as it starts spinning).
- Wait for the count to start moving, run to the north of the skylight (taking contact damage from one of the swords if necessary), and knock another sword back at the count.
- Wait for the count to start moving again, and run to the south of the skylight.
- Wait for the count to start his dash attack, and run to the north of the skylight again. If done correctly, the count will dash into the skylight and die (+50 EXP).
Note
Click to open video
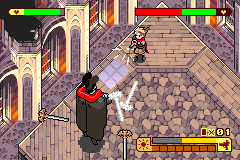
Purification
Equip the Knight Frame, and use all 4 remaining ![]() Bananas to drag the coffin back to the pile driver. Go back the way you came undetected:
Bananas to drag the coffin back to the pile driver. Go back the way you came undetected:
- In the room with the two Boks and two pressure plates: Stun the upper Bok to leave the room undetected.
- In the room with the Vaniboks: Leave the coffin at the entrance, pull the lever, and start dragging the coffin again.
- After the garden: Go south at the intersection and push the box out of the way. Alternate between pushing the box and dragging the coffin:
At the pile driver, activate two generators simultaneously using your gun’s spread.
Complete the purification (+50 EXP), which should give you an S-rank. Open the two chests on the right (3 ![]() Evil Bananas, 2
Evil Bananas, 2 ![]() Speed Nuts) and walk to the Solar Tree.
Speed Nuts) and walk to the Solar Tree.
Solar Tree
Talk to Lita, then plant a single Green Apple (A, start, A).
Note
If you have gotten a random Gold Apple drop, you can instead plant a Gold Apple + either a Green or a Red Apple. This skips a “The solar tree is calling…” text box after Firetop Mountain.
Deserted Arsenal
| Resource | Start with | Get | Consume | End with |
|---|---|---|---|---|
| Sol Lens EXP | 288 | +70 | 358 | |
| Evil Banana | 3 | -1 | 2 | |
| Speed Nut | 6 | +6 | -1 | 11 |
| Bomb | 1 | +1 | 2 |
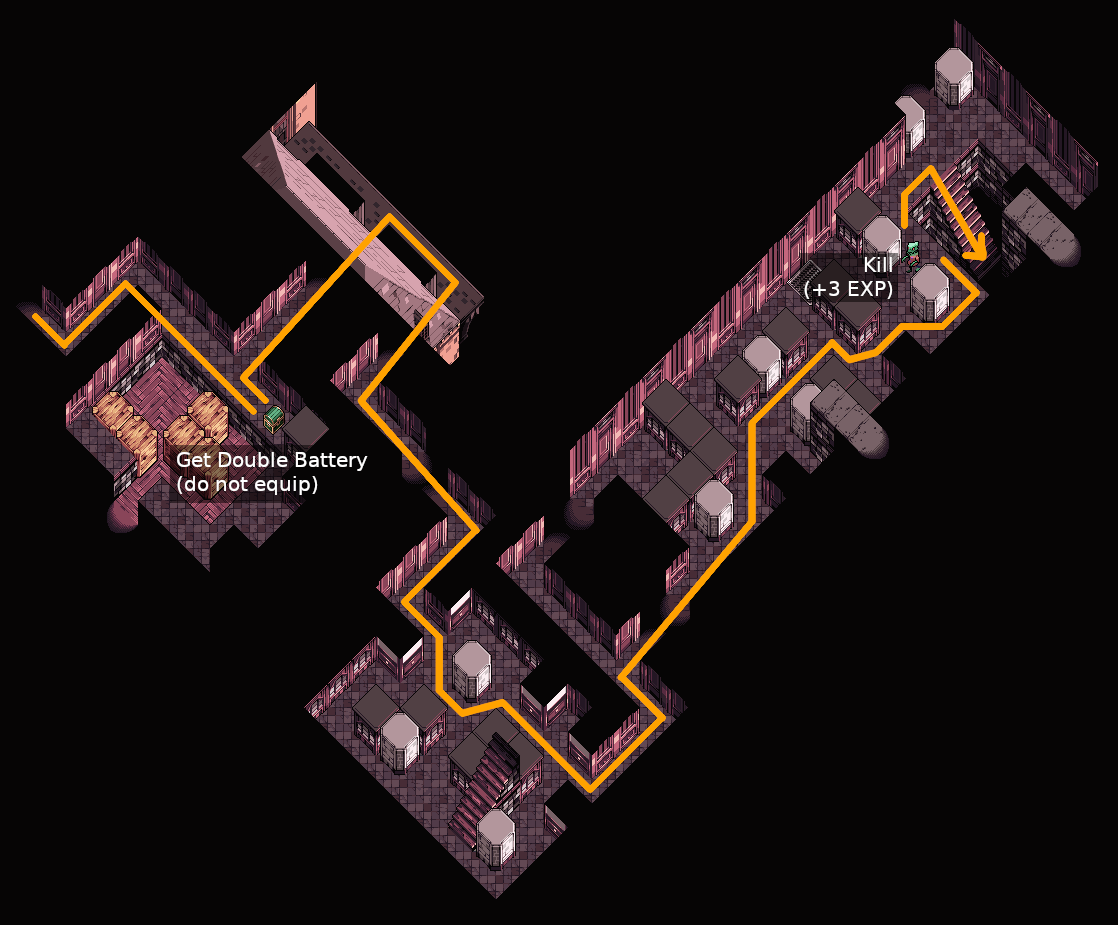
Use an ![]() Evil Banana to solve the box push puzzle.
Get the Fencer Frame from the green chest, then equip it and use a
Evil Banana to solve the box push puzzle.
Get the Fencer Frame from the green chest, then equip it and use a ![]() Speed Nut. Avoid detection by the Steps and the Boks in the final room to ensure S-rank.
Speed Nut. Avoid detection by the Steps and the Boks in the final room to ensure S-rank.
You can open the chest containing the Bomb from the staircase, this avoids having to stun the Bok below:
Trap
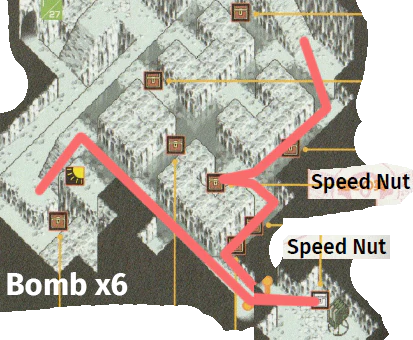
Defeat the Sword with the Fencer Frame by holding B, and alternate pressing Right and Down on the D-pad to create a spread. With the Fencer Frame, the spread created by changing direction deals the most damage. Do not hold two directions on the D-pad at the same time. After clearing the trap (+70 EXP), open the reward chest for 6 ![]() Speed Nuts.
Speed Nuts.
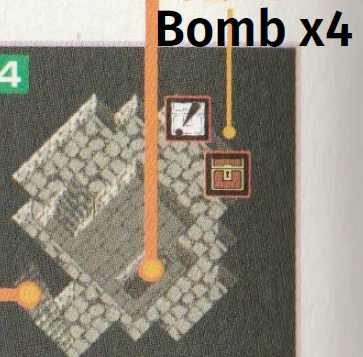
Crumbling Mine
| Resource | Start with | Get | Consume | End with |
|---|---|---|---|---|
| Sol Lens EXP | 358 | +80 | 438 | |
| Banana | 0 | +2 | 2 | |
| Speed Nut | 11 | -1 | 10 |
The target rank for this dungeon is A. You can ignore all enemies in this dungeon: You will get detected 3 times, but this will still be enough to get an A rank.
Trap
Start by equipping the Double Battery and the Spear Frame, then kill the Mummies by bunching them up against a wall:
- Knock on the center rock.
- Hug the wall directly to the south, and wait for the Mummies to be bunched up.
- Use the Spear Frame to push them towards the north rock.
- Now you just shoot them until they all die. Stay close to the mummies because the damage output of the Spear Frame decreases with distance.
Note
Click to open video

After clearing the trap (+80 EXP), open the reward chests for 2 ![]() Bananas and the
Bananas and the ![]() Triangle Key. Use a
Triangle Key. Use a ![]() Speed Nut and leave the dungeon:
Speed Nut and leave the dungeon:
Firetop Mountain
TODO
Permafrost
TODO
Remaining Tower 1
TODO
Delusion Forest
TODO
Sol City
Chicken Trap has ![]() 5 Speed Nuts and
5 Speed Nuts and ![]() 5 Bananas
5 Bananas
Crusader Frame
TODO
Flame Tower
TODO
Earth Tower
TODO
Frost Tower
TODO
Cloud Tower
TODO
Central Tower
TODO
Sabata
Phase 1
TODO
Phase 2
TODO
Hel
Phase 1
TODO
Phase 2
TODO
Lens Exp Routing (Outdated)
| Location | Sol | Frost | Notes | ||
|---|---|---|---|---|---|
| Delta | Total | Delta | Total | ||
| Fog Castle | +3 | 3 | 1 Bok * 3 EXP | ||
| Fog Castle Bats | 3 | No exp | |||
| Fog Castle Exit | +3 | 6 | 1 Bok * 3 EXP | ||
| Fog Castle Purification | +100 | 106 | |||
| Small Cave | +3 | 109 | 1 Bok * 3 EXP | ||
| Small Cave Trap | 109 | No exp | |||
| Gate of the Dead | 109 | ||||
| Gate of the Dead Trap | +30 | 139 | 1 Sword * 10 EXP + 20 | ||
| Ancient Forest | 139 | ||||
| Ancient Forest Trap | +40 | 179 | 4 Golems * 5 EXP + 20 | ||
| Bloodrust Mansion | +3 | 182 | 1 Bok * 3 EXP | ||
| Count Battle | +50 | 232 | |||
| Bloodrust Mansion Exit | +3 | 235 | 1 Bok * 3 EXP | ||
| Count Purification | +50 | 285 | |||
| Deserted Arsenal Trap | +70 | 355 | 1 Sword * 30 EXP + 40 | ||
| Deserted Arsenal Trap | +70 | 425 | 1 Sword * 30 EXP + 40 | ||
| Crumbling Mine Trap | +80 | 505 | 4 Mummies * 10 EXP + 40 | ||
| Firetop Mountain | 505 | ||||
| --- Need Sol Lv2/500 EXP here --- | |||||
| Muspell Battle | +150 | 655 | Always gives 150 EXP | ||
| Muspell Purification | +150 | 805 | |||
| Permafrost | 805 | ||||
| Garmr Battle | +150 | 955 | Always gives 150 EXP | ||
| Garmr Purification | +150 | 1105 | |||
| Delusion Forest | 1105 | +60 | 60 | ||
| Sol City Traps | 1105 | +87 | 147 | 3 Chickens * 29 EXP; 2nd trap gives no EXP??? | |
| Sol City | 1105 | +30 | 177 | 1 Golem * 30 EXP | |
| Carmilla Battle | 1105 | +300 | 477 | ||
| Carmilla Purification | +300 | 1405 | 477 | ||
| Flame Tower | 1405 | +27 | 504 | 3 Boks * 9 EXP | |
| --- Need Frost Lv2/500 EXP here --- | |||||
| Muspell 2 | +100 | 1505 | 504 | If you don't get the Sol Lens kill, kill 4 chickens in Cloud Tower | |
| Earth Tower | 1505 | 504 | |||
| Count 2 | +100 | 1605 | 504 | ||
| Frost Tower | +36 | 1641 | 504 | 4 Boks * 9 EXP (from RSG at start) | |
| Garmr 2 | +100 | 1741 | 504 | ||
| Cloud Tower | 1741 | 504 | |||
| Carmilla 2 | +100 | 1841 | 504 | ||
| Dark Castle Trap | +150 | 1991 | 504 | 10 Tentacles * 15 EXP | |
| Dark Castle | +9 | 2000 | 504 | 1 Bok * 9 EXP | |
| --- Need Sol Lv3/2000 EXP here --- | |||||
| Sabata Phase 1 | +200 | 2200 | 504 | ||
| Sabata Phase 2 | +300 | 2500 | 504 | ||
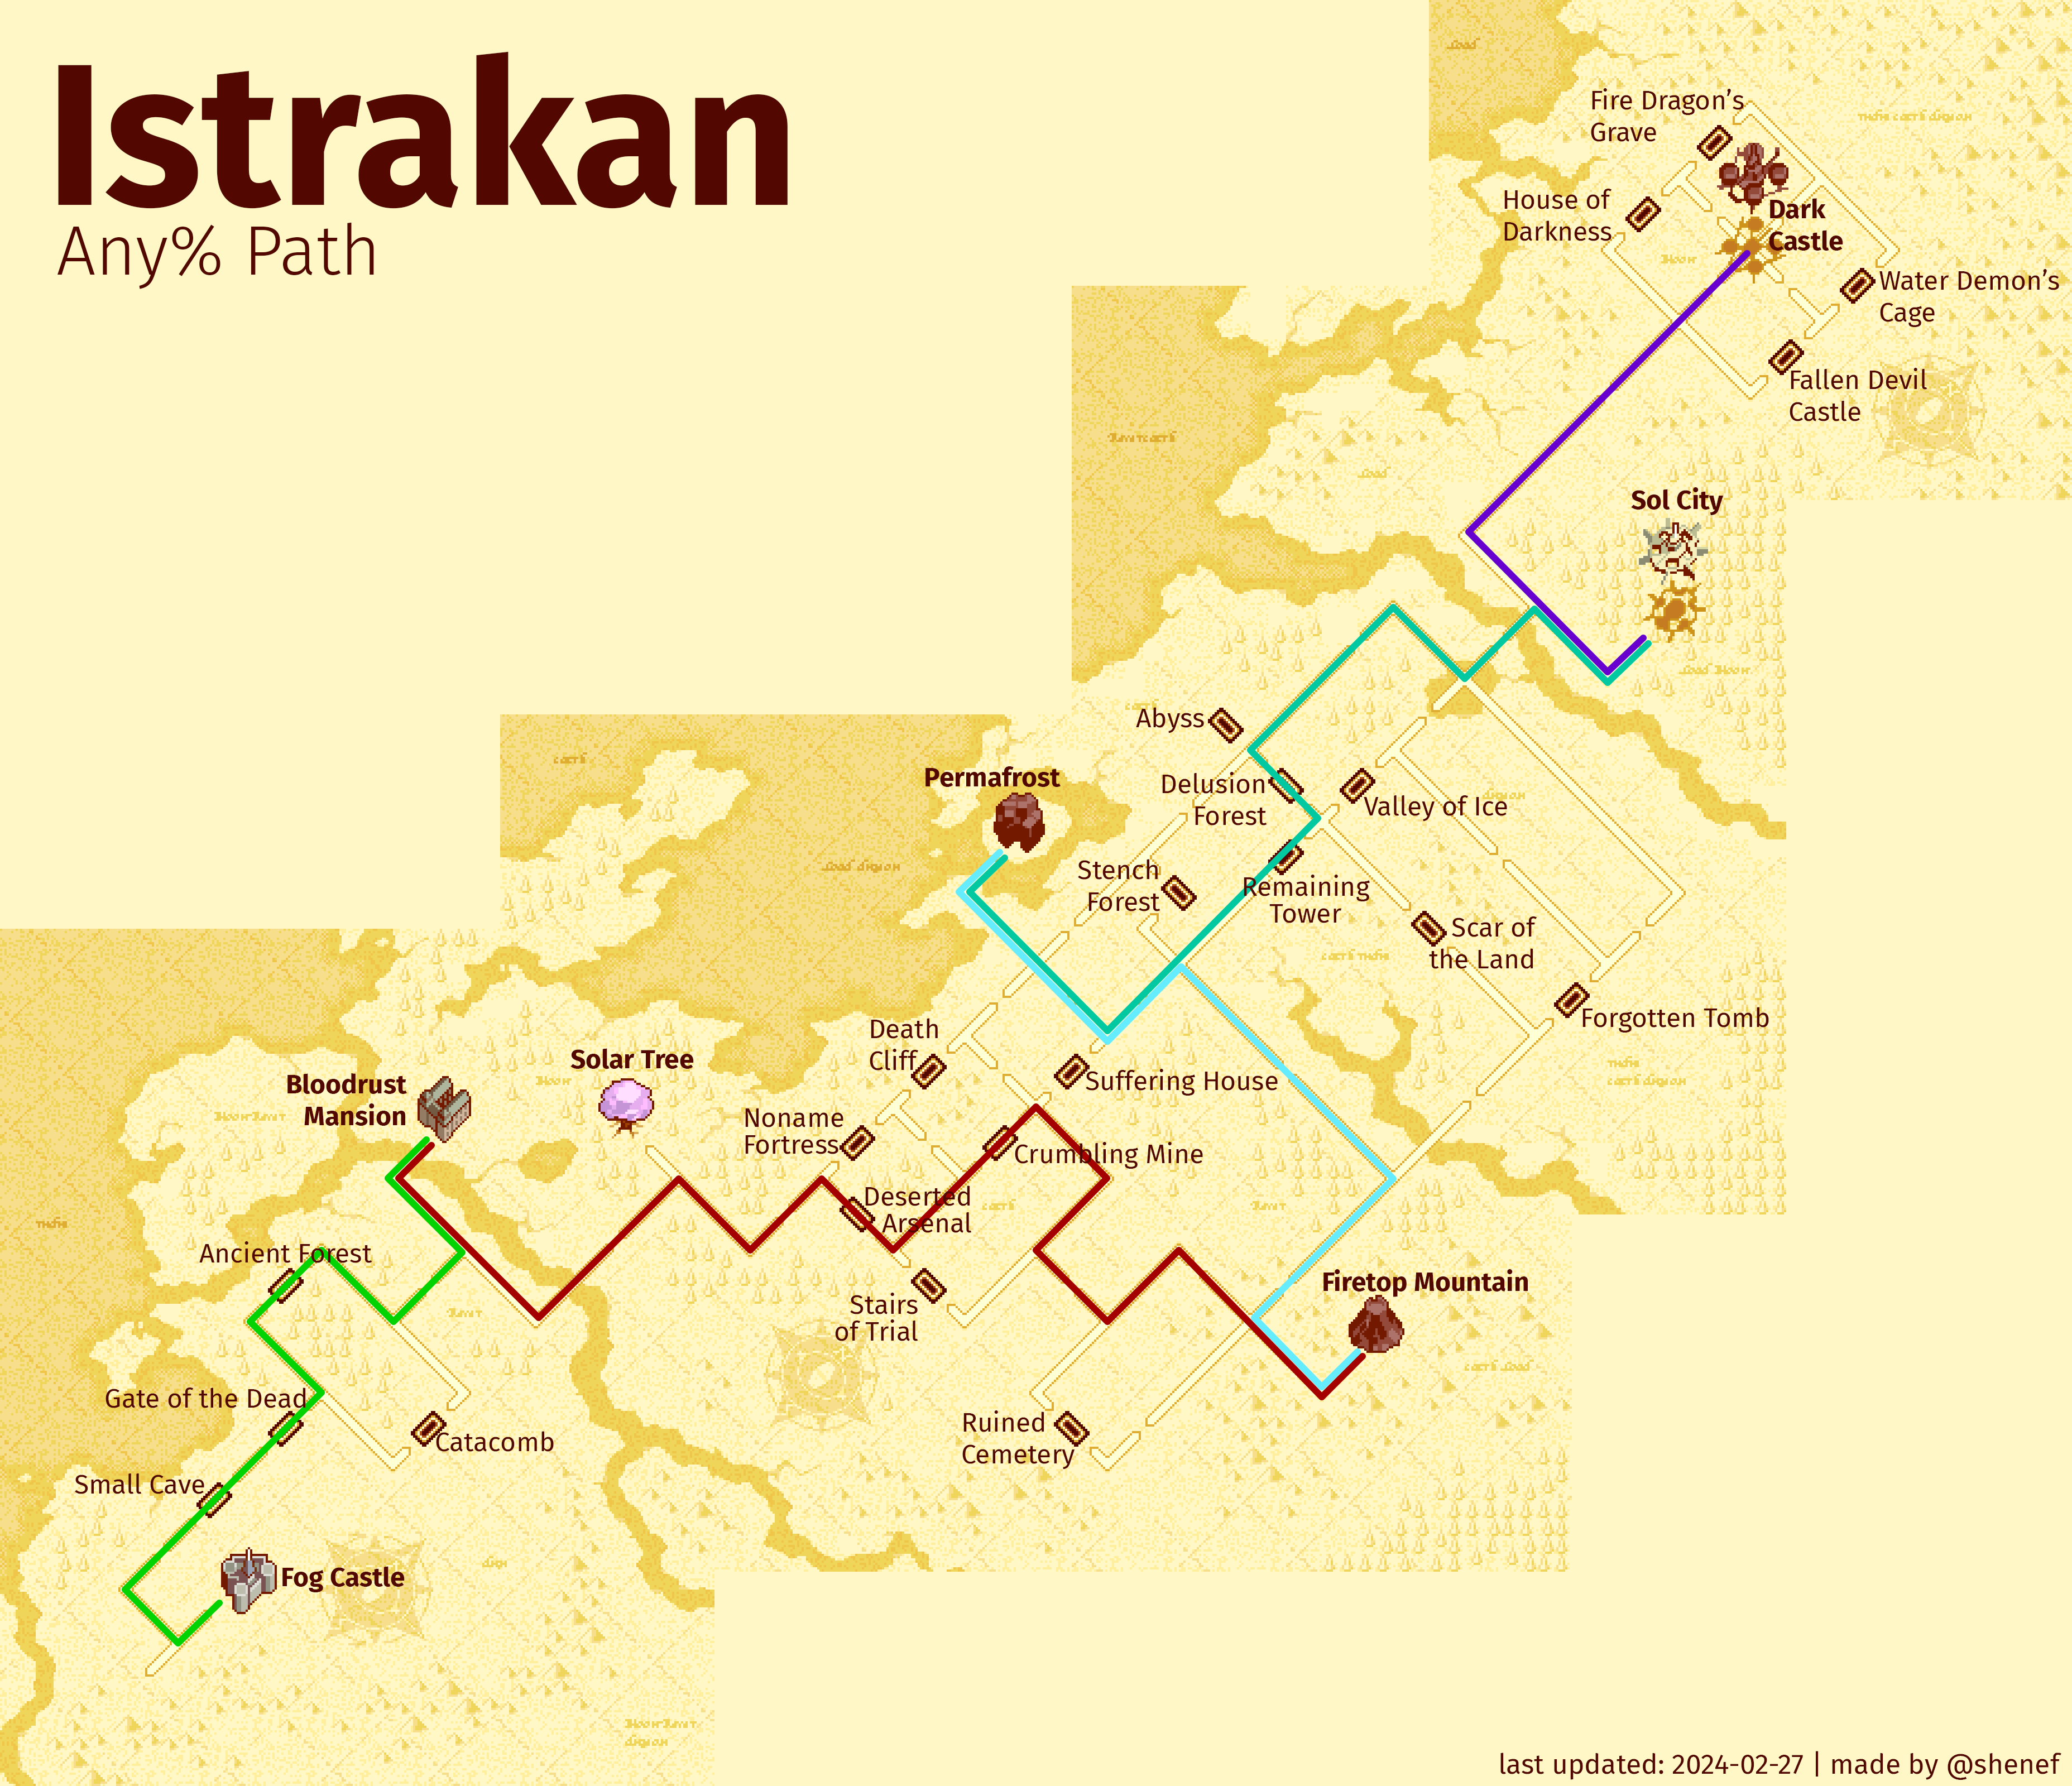
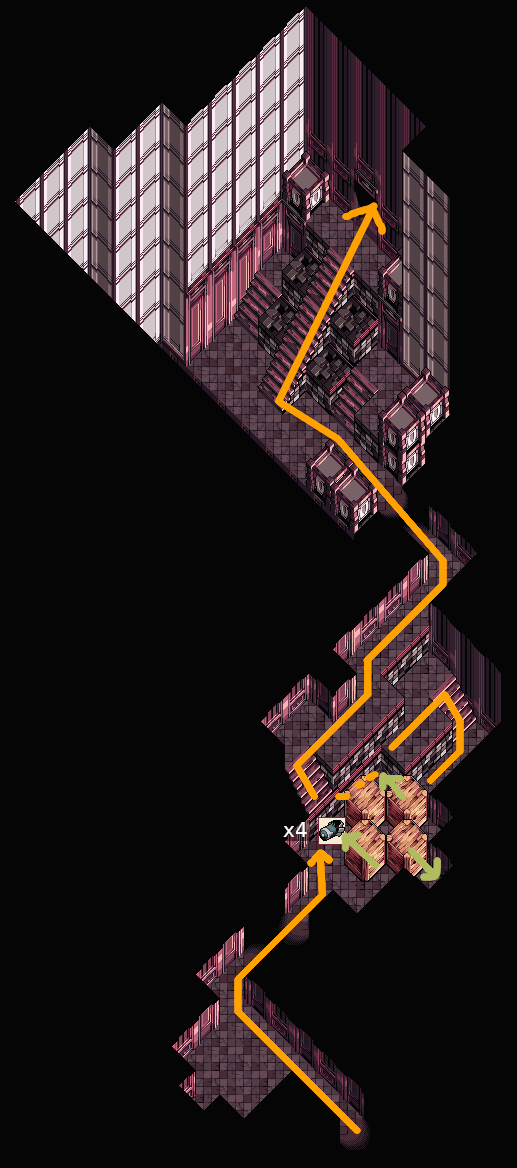
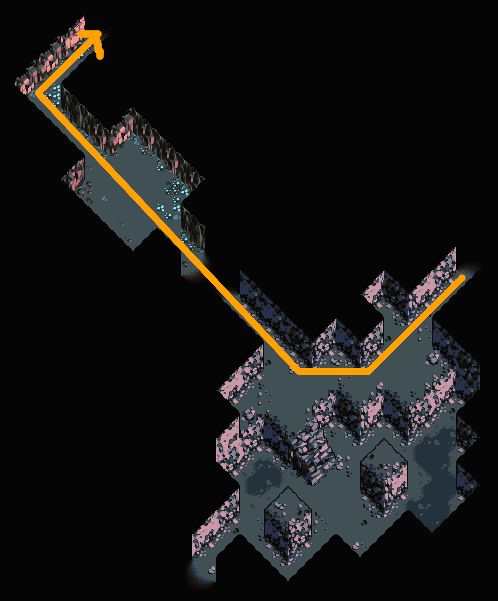
Boktai 1: 28 Dungeons Route
About this Guide
While the current WR follows this route, it is far from optimized. So far only the Empty Gourds are properly routed; Speed Nuts, Bananas and Grenades have a lot more potential and the WR still picks up a good amount of items that are not necessary.
Please suggest improvements!
Some of the images are kinda rough, initially these were just my (shenef) personal notes and are now slowly being expanded. For now, if a dungeon just has “…”, there is either nothing noteworthy to do or it’s still directly from my notes.
The icons on the map indicate how you are expected to leave that dungeon.
Some dungeons simply take longer to leave on foot.
 Click for full size
 Run video
Route
- In-game start time: 3:40 AM
Small Cave
Gate of the Dead
…
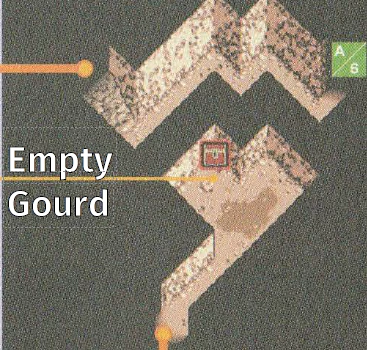
Ancient Forest
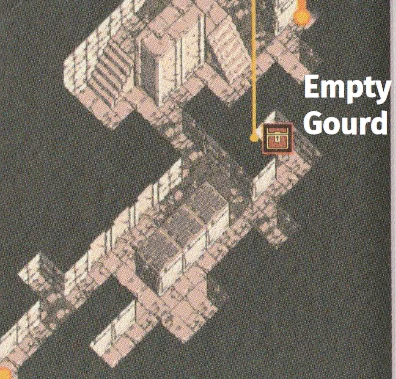
- Get Empty Gourd in first room
Catacomb

Bloodrust Mansion
Solar Tree
- plant 2 Speed Nuts
Deserted Arsenal
Finish this Dungeon three times. This gains you a total of +18 Speed Nuts and +3 Bombs.
Note: Any% recently switched from two completions back to one completion.
It’s likely that, even in 28 Dungeons, good item routing could reduce it from three completions to two or even one.
Stairs of Trial
- Don’t use a Speed Nut after the puzzle
Ruined Cemetery
…
Firetop Mountain
Noname Fortress
Death Cliff
…
Crumbling Mine
…
Suffering House
Permafrost
Stench Forest
- Sword Boss
Remaining Tower
Scar of the Land
- ↓, ↓, wait, ↓ →, → ↑, →
- Frost Lens, Spear Frame, Heal, use Flame Nut
Forgotten Tomb

- destroy Shield, use Bombs
Abyss
- Use Banana for puzzles, 1 Speed Nut after first puzzle
- +1 Speed Nut on light bridge
- Get Javelin
Delusion Forest
- Entering: 4x straight, 2x left
- Get reward
- Leaving: right, then move to entrance
Valley of Ice
- Take top path in slide room
Sol City

- Don’t pick up the grenades after Sabata until after Carmilla
- Two Speed Nuts in north trap
- Carmilla: use 15+1 Grenades
Note
You need at least 2 Empty Gourds at this point.
If you have 3, you can gourd out of Water Demon’s Cage.
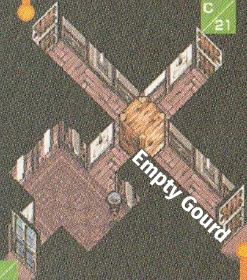
House of Darkness
- Exit with Empty Gourd
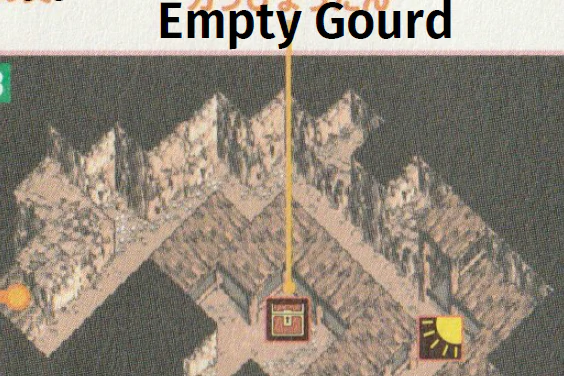
Fire Dragon’s Grave

- Exit with Empty Gourd
Water Demon’s Cage
- Sol 3 + Fencer swing
- Exit with Empty Gourd if you have more than 1
Fallen Devil Castle
- (First Floor)
- Exit with Empty Gourd
Frost Tower
- Use Banana after Red Shroom
Cloud Tower
- Block puzzle solution:
- = + /
Dark Castle Core
- Tentacle Trap Rewards:
(Not required but could be useful)- Top: 10 Golden Apples
- Middle: 10 Solar Nuts
- Bottom: 5 Speed Nuts
- Color Puzzle solutions:
- 53
- 254
Boktai 1: NG+ Hard
Important
This guide is currently very much a Work in Progress and is therefore far from optimized.
Feel free to contribute on Discord or on the GitHub repository.
Setup
Before the end of your previous playthrough, plant at least 3x Empty Gourd.
Starting inventory
- Consumable
- Heal Fruit: 99
- Speed Nut 99
- Banana: 99
- Redshroom: 5
- Bearnut: 5
- All lenses Level 3 except Earth and Star.
- Frame
- Fighter, Knight, Dragoon
- Samurai, Tempest, Phalanx, Calamity
- Juggler, Guardian, Phantom
- Batteries
- Single, Infinite, Chaos
- Grenades
- Bomb, Pineapple, Rising Sun, Flash, Nightmare
Starting time: 4:20 am
Fog Castle
Use RSG before entering the building.
Use RSG after leaving the room with the coffin.
Ancient Forest
Use Phalanx or Guardian + Flash?
Bloodrust
Use RSG before entering basement
Use Luna + Calamity for switch puzzle, diagonal first (Bok doesn’t move on hard). Keep on for next trap Immediately use RSG in next room so it runs out by the next puzzle Stun management!
Switch to Guardian + Cloud
Solar Tree
Open Chests as needed. Should give 2-5 Empty Gourd each.
Firetop
- Frost + Guardian + RSG
Muspell
- Use Pineapple Grenade
- Gun Del Hell Spread
Permafrost
- Flame + Guardian + RSG
Garmr
- Use 3 Nightmare Grenades
- some Flame lens damage
Boktai 2
Guides
Resources
Boktai 2: Any% Route
About this guide
This guide assumes you are playing on the Japanese 1.0 release of Boktai 2.
It will likely work fine for other releases but some strategies like RNG manipulation will need different timings.
Directions for paths and exits will use ↖️, ↗️, ↙️ and ↘️.
Terminology
- RNG manip
- Short for “Random Number Generator Manipulation”. Used to influence the randomness within the game to make things happen that are normally reliant on chance.
- Soft reset
- Pressing A + B + Start & Select at the same time reboots the game. This is useful for RNG manip and can be used to skip dragging coffins back to town.
- STRG and AGIL
- Strength and Agility. The third and fourth status point options. They influence your physical damage, movement speed and defense.
Exp table
Tip
Click to open
Imported from this spreadsheet.
Before starting
Make sure you have an existing save file and that the Crossover option is unlocked in the Link menu.
To unlock the Crossover option, go to the Link menu, then press the following buttons in order:L R L R L L R R R R L L Select Start Select Start.
Emulator settings
- Requires BizHawk 2.6.3 or newer.
- Set “Skip BIOS” and “RTC” to False in the GBA Settings.
Setting “Skip BIOS” is mandatory as this creates parity with actual hardware.
Disabling RTC simulates an empty cartridge battery which enables some of the strats in this guide.
Initial Game Settings
Ensure that no UV is reaching the solar sensor before confirming calibration settings (Not relevant for emulator play):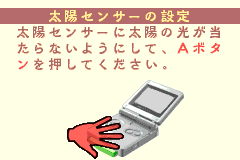
Set the system time to August 1st 2004 at 11:55PM (2004/08/01 23:55):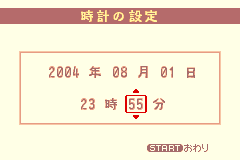
Use the default region selection.
Select New Game and enter the password for the “Dark Boy” title.
This title grants +2 STRG, +2 AGIL, a ![]() Power Nut and a
Power Nut and a ![]() Bearnut.
Bearnut.
Use the characters to the left of the numbers:
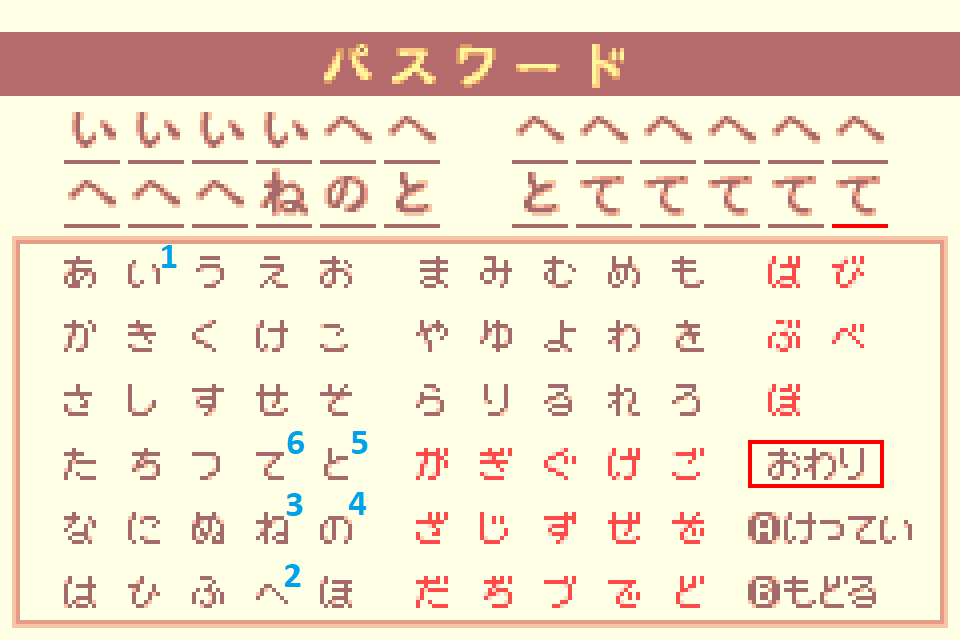
Use a single character for the player name. This saves a few frames each time the name is typed out in cutscenes.
Timing starts when confirming your settings.
Tutorial
After the intro, progress through the linear route until you run into the trap.
Skeleton Trap
- Proceed through the ↘️ exit to obtain the
 Gladius.
 - Backtrack and hit the Skeleton from behind to reach Lvl 2.
Proceed through the ↖️ exit, then through the ↗️ exit twice.
Zombie Trap
- Hit the Zombie 3 times to trigger the cutscene.
- Open the menu and change the text speed to Fast:
- Unequip your current armor (less defense, faster walking speed).
- Hit the Zombie from the front twice.
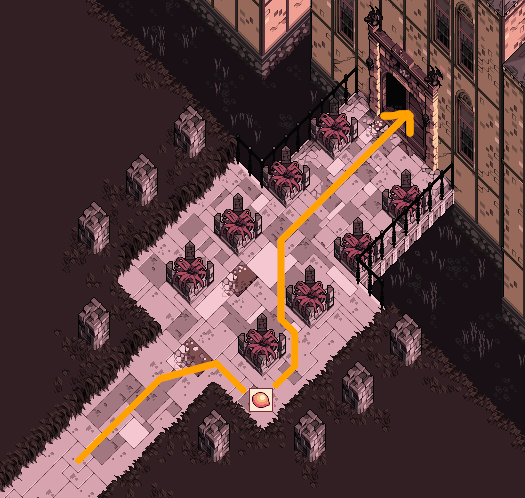
San Miguel
After the dialogs, kill the first Ghoul for EXP then proceed through the ↗️ exit.
At the piledriver screen, proceed through the ↖️ exit.
Proceed towards the ↗️ exit, kill the Ghoul for EXP, enter the Cathedral.
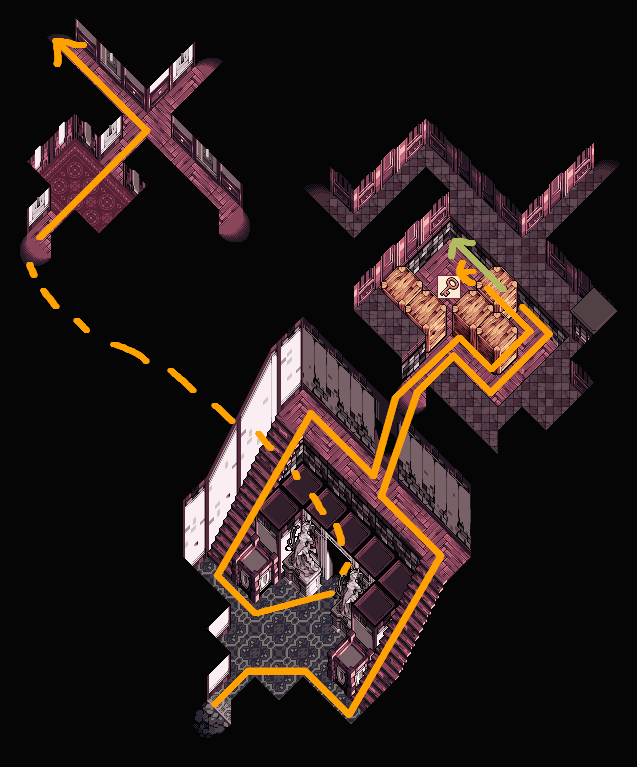
Cathedral
Kill two Ghouls to reach Lvl 3, raise AGIL to 17 and put your remaining stat point into STRG.
Push the blocks to progress and proceed through the ↗️ exit.
After the cutscene, proceed through the ↘️ exit.
Block Puzzle
Open the chest for a ![]() Club.
Club.
Backtrack, kill the Ghoul in the previous room for EXP.
Destroy the first wooden block to push the 2 stone blocks, also open the chest for a ![]() Power Nut.
Power Nut.
Ensure that you push the stone block into the hole in the floor, otherwise this room will be unsolved later on.
Proceed through the ↘️ exit by destroying the wooden block.
Graveyard & Basement Puzzles
Proceed straight ahead to enter the Graveyard.
- 1st row: Push the 2nd tombstone
- 2nd row: Push 1st
- 3rd row: Push 2nd
Backtrack and take the stairs into the basement.
Kill all Ghouls until you reach the 5th room. You should now be Lvl 4.
In the 5th room, knock on the wall near the center of the room, then run along the right outside wall to avoid the Zombie.
In the remaining basement rooms, use ![]() Flame with
Flame with ![]() Sword to light torches and
Sword to light torches and ![]() Club to activate levers.
Club to activate levers.
Push the blocks as shown here, then touch the lamp:
After leaving the basement, put all stat points into STRG.
Skeletons Trap
- Use
 Sol and hit the Skeletons from behind.
 - You should reach Lvl 5 after this fight.
Put all stat points into STRG.
Open the chest for the ![]() Yellow Orb and proceed through the bottom ↖️ exit.
Yellow Orb and proceed through the bottom ↖️ exit.
Knock on the central wall to lure the Ghoul, then open the chest for a ![]() Warp Leaf and proceed.
Warp Leaf and proceed.
Break and move the wooden blocks to get the ![]() key, then light the torch and place the
key, then light the torch and place the ![]() Yellow Orb.
Yellow Orb.
Refill life if under 50% and refill energy to at least 80% before leaving the room.
Backtrack to the trap room and kill a Ghoul, then proceed through the top ↘️ exit.
The ![]() Red Orb will be in a random skylight.
Red Orb will be in a random skylight.
Check the spot directly next to the stairs, then take the stairs whether or not you found it.
Ghouls + Zombie Trap & Short Sword RNG Manip
- Follow the RNG manip method in the below video to get a
 Short Sword:
Proceed through the ↖️ exit and fall down to get the ![]() Short Spear.
Short Spear.
Kill two Ghouls, then backtrack to this room:
Use the spear on the lever to open the gate and proceed up the stairs.
Light the first torch with ![]() Flame and place the
Flame and place the ![]() Red Orb if you already found it, otherwise continue upstairs.
Red Orb if you already found it, otherwise continue upstairs.
Hold left upon entering the top floor to trigger the trapdoor and light the torch with hammer and ![]() Flame to set up the timing to walk over the trapdoor.
Flame to set up the timing to walk over the trapdoor.
Talk to the hint panel in the bottom-left corner (necessary for a puzzle).
Drop through a trapdoor and backtrack to the Red Orb room.
If you did not already get the ![]() Red Orb, check all of the skylights whilst moving through the room, then light the torch with spear and
Red Orb, check all of the skylights whilst moving through the room, then light the torch with spear and ![]() Flame.
Flame.
Proceed down the new stairs and go outside.
Once outside, destroy the 2 statues with spear and ![]() Sol to obtain the
Sol to obtain the ![]() Blue Orb.
Blue Orb.
Open the orange chest in that area for a ![]() Warp Leaf.
Warp Leaf.
Backtrack to the Red Orb room.
If you did not already find the ![]() Red Orb, do not proceed before finding it.
Red Orb, do not proceed before finding it.
Backtrack to where you obtained the spear, but instead of falling, proceed through the ↖️ exit.
Library Puzzle
Talk to these bookshelves to open the gate:
Lamp Puzzle
Open the first chests on the left for a ![]() Power Nut and a
Power Nut and a ![]() key.
key.
Green Orb Puzzle
Light the torches with spear and ![]() Flame, then push the first block to reach the second one.
Flame, then push the first block to reach the second one.
Push the second block onto the weight switch to activate the lamp.
Interact with the lamp to obtain the ![]() Green Orb.
Green Orb.
Backtrack to the main room and kill two Ghouls to reach Lvl 6.
Backtrack to the room with the trapdoors and hint panel.
Place the ![]() Red Orb before going to the top floor if you did not already place it.
Red Orb before going to the top floor if you did not already place it.
Place the ![]() Green Orb (2nd option):
Green Orb (2nd option):
Proceed through the ↖️ exit (Refill life on skylights if low).
Light the torch with ![]() Flame and place the
Flame and place the ![]() Blue Orb.
Blue Orb.
Backtrack and proceed down the new stairs in the main room, refill energy on the Solar Station.
Equip the ![]() Short Sword, then put all stat points into STRG.
Short Sword, then put all stat points into STRG.
White Duneyrr
- Light the torch in the center with spear and
 Flame. With precise positioning you can hit all four candles with one attack.
 - Line up directly behind Duneyrr and use the Short Sword and Sol to attack Duneyrr twice per cycle.
- After she flinches, move onto her position, then switch back to spear and Flame to hit the torch in the center again.
- Repeat until the fight is over, if executed correctly your energy will last until the end of the fight and Duneyrr will never be able to act.
- You should reach Lvl 7 after this fight.
Proceed through the ↗️ exit to trigger a cutscene.
Ignore the chest and exit the room.
After picking up the coffin, put all stat points into STRG and use a ![]() Power Nut.
Power Nut.
Proceed through the top ↖️ exit in the main room.
Activate the 3 weight switches by using the coffin and pushing the block.
Proceed through the middle ↖️ exit and open the blue chest (![]() key) and the chest to the left (
key) and the chest to the left (![]() Power Nut).
Power Nut).
Use a second ![]() Power Nut when your buff expires.
Power Nut when your buff expires.
Drag the coffin back to town and into the piledriver screen.
White Duneyrr Purification
Enable max sunlight for purifications, you cannot start a purification sequence without sunlight enabled.
- Activate three generators and leave the fourth inactive until after you’ve started the purification to skip a long dialog.
- Stand east-southeast of the coffin and aim to knock her back in as soon as she escapes.
- Her first attack begins directly after this, do not stand in it as you will die quickly.
After the purification, choose the first dialog.
San Miguel (2)
Talk to Smith near the forging house, then proceed through the ↘️ exit and enter the Remains.
Remains
In the main room with Clay Golems, proceed through the ↖️ exit, then take the stairs.
Vampire Bats Trap
- If no armor is equipped, be careful as you will die in 2 hits.
- Try to group them up and use Sol.
Use no element to kill the Yellow Slimes, they have high elemental resistances.
Refill health on the Yellow Slime corpses as they die, so that you can pick up a ![]() Power Nut if one drops.
Power Nut if one drops.
Go ↖️ to push a block, then leave the room.
REFILL LIFE AND TURN OFF SUNLIGHT before proceeding through the ↗️ exit; Solar Wind will kill you if sunlight is enabled, and you want to damage-boost through the flame jets which requires >70% life.
Damage-boost through the flame jet, then stand on the floating platform and light the torch with ![]() Flame to proceed.
Flame to proceed.
Light the second torch as the two floating platforms intersect, then wait for the second flame jet to fire before proceeding.
During the dialog, choose the first option.
Backtrack through the solar wind room, damage-boost through the last flame jet.
Refill life before proceeding down the stairs.
Extinguish the flame with ![]() Frost to proceed.
Frost to proceed.
Push the block, then proceed through the ↖️ exit.
Use ![]() Flame to melt the blocks.
Flame to melt the blocks.
If you did not get a random ![]() Power Nut drop from the Yellow Slimes, open the top chest for a
Power Nut drop from the Yellow Slimes, open the top chest for a ![]() Power Nut.
Power Nut.
Use ![]() Frost to make the floating block fall, then refill life/energy to 100% on the skylight.
Frost to make the floating block fall, then refill life/energy to 100% on the skylight.
Sword, Yellow Slimes, Clay Golems Traps
- Sword: Use Sol to deal more damage.
- Attack 10 times before dodging out of the way of its thrust, then attack 11 more times before it teleports. Finish it off after the teleport.
- You should reach Lvl 8 after this fight.
- Yellow Slimes: Attack without using any element.
- Clay Golems: Knock on the walls so that they stun each other, then finish them off.
- With a +0 Short Sword, each set of Clay Golems will need 3 hits with Sol plus 1 additional unenchanted hit to kill quickly.
- If any Clay Golems kill each other, you must kill extras later to make up the lost EXP.
- You should reach Lvl 9 after this fight.
- With a +0 Short Sword, each set of Clay Golems will need 3 hits with
Open the blue chest for a ![]() key, then proceed through the ↘️ exit and open the door.
key, then proceed through the ↘️ exit and open the door.
During the dialog, choose the second choice, then proceed up the stairs in the next room.
Kill the Vampire Bat and proceed.
Refill energy to 100% before taking the ↗️ exit to go back indoors.
2-Colour Puzzle
Put all stat points into STRG and use a ![]() Power Nut.
Power Nut.
Push one block towards the start of the room like this:
After that, push the other block on its spot, then do the same with the first block:
In the next room, push the floating block with sword and ![]() Cloud ↘️, then spear ↗️, then lower it with
Cloud ↘️, then spear ↗️, then lower it with ![]() Frost.
Frost.
In the newly-unlocked room, destroy the stone block with ![]() Cloud to get the
Cloud to get the ![]() key.
key.
Backtrack to the previous room and push the block on the left, proceed through the ↖️ exit.
Break the stone block on the way with ![]() Cloud, then select
Cloud, then select ![]() Sol.
Sol.
Open the door and kill the Yellow Slime with unenchanted hits.
Do a short energy refill on the Yellow Slime corpses as they die, so that you can pick up a ![]() Power Nut if one drops.
Power Nut if one drops.
Proceed through the ↘️ exit and push the block.
Backtrack outside and take the stairs, then proceed through the ↘️ exit.
In the room with skulls, make sure that you have no sunlight (deactivates traps).
Open the chest on the left (bottom) for a ![]() Speed Nut, then proceed through the ↗️ exit.
Speed Nut, then proceed through the ↗️ exit.
4-Colour Puzzle
Use a ![]() Power Nut, then push the blocks like this (start with the
Power Nut, then push the blocks like this (start with the ![]() Flame block):
Flame block):
Kill the two Mummies with ![]() Sol and proceed up the stairs.
Sol and proceed up the stairs.
Proceed to the bottom of the next room, then kill the Clay Golem with ![]() Cloud before taking the ↖️ exit.
Cloud before taking the ↖️ exit.
Proceed through the immediate ↙️ exit.
In the room with the flame jet, use ![]() Flame on the Mummy to activate the torch, then proceed up the stairs.
Flame on the Mummy to activate the torch, then proceed up the stairs.
Avoid the Yellow Slimes and open the blue chest for a ![]() key.
key.
Refill life/energy before going back indoors, then proceed through the ↙️ exit.
Push the block and proceed through the ↘️ exit.
Open the ↗️ door and proceed.
Axe Trap
- It’s an axe!!
- Use a single unenchanted hit, then Sol hits to deal more damage.
- Try not to miss any Sol hits as energy is strictly routed here.
- You should reach Lvl 10 after this fight.
Open all the chests for a ![]() key, the
key, the ![]() Dynamite magic, and a
Dynamite magic, and a ![]() card.
card.
Use a ![]() Solar Nut.
Solar Nut.
Backtrack to the first room by proceeding through the ↙️ exits.
Kill all four Clay Golems with ![]() Cloud and proceed through the ↘️ exit.
Cloud and proceed through the ↘️ exit.
Kill both Clay Golems with ![]() Cloud and proceed in the same direction.
Cloud and proceed in the same direction.
You should now be Lvl 11.
Open this hidden chest for a ![]() Warp Leaf, then open the door:
Warp Leaf, then open the door:
Skip getting water from the fountain, then proceed.
Desert Puzzle
You must now find three ![]() Stone Tablets that are in fixed spots on eight screens:
Stone Tablets that are in fixed spots on eight screens:れたオアシスの下 / Beneath a dried-up oasis")


ちたゴーレムの修ろ / Behind a crumbling golem")


Begin on the southwest screen (first image) and proceed counter-clockwise.
On the south screen (second image) kill a Clay Golem with ![]() Cloud.
Cloud.
If you already have two ![]() Stone Tablets by this point, proceed ↗️ to the central screen and interact with the statue to check where the remaining tablet is.
Stone Tablets by this point, proceed ↗️ to the central screen and interact with the statue to check where the remaining tablet is.
When you have all three tablets, proceed to the central screen and talk to the statue:
Refill energy to 100% before proceeding into Remains B.
If you do not currently have two ![]() Power Nuts in the inventory, open this hidden chest:
Power Nuts in the inventory, open this hidden chest:
Torch Puzzle
Light the torches in this order:
Proceed downstairs, kill the Clay Golem with ![]() Cloud and the Mummies with
Cloud and the Mummies with ![]() Sol.
Sol.
Proceed through the ↙️ exit.
Start with the puzzle room on the top-right:
Select spear and ![]() Cloud.
Cloud.
Push the first block ↘️.
Push the second block ↘️ onto the weight switch.
Push the first block ↖️↗️↖️ onto the other switch, then use ![]() Frost on both blocks.
Frost on both blocks.
Proceed to the puzzle room on the top-left:
Refill energy to 100% on the Solar Station.
Use ![]() Flame on the block, then spear and
Flame on the block, then spear and ![]() Cloud to push it ↖️.
Cloud to push it ↖️.
Use your ![]() Speed Nut.
Speed Nut.
Use spear and ![]() Cloud to push the block ↙️.
Cloud to push the block ↙️.
Open this hidden chest for a ![]() Warp Leaf:
Warp Leaf:
Refill energy to 100% on the Solar Station before leaving the room.
Proceed to the puzzle room on the bottom-left:
Activate all of the floor switches, then hit the lever with the spear.
Equip sword and ![]() Sol before leaving the room.
Sol before leaving the room.
Proceed to the final puzzle room on the bottom-right:
Activate the first lever with the sword, then run ↙️.
When you’re close enough, run ↗️ onto the switch.
Do not assign stat points before the boss fight.
- 31 STRG (33 Attack) is enough for the fight, you want to save these stat points for later.
Vampire
- Stay away so that Sabata doesn’t get hit.
- Position yourself so that the swords don’t go in Sabata’s direction.
- Only hit the Vampire when the black hole is active.
- Face in the same direction as the Vampire to push him into the black hole faster.
- When the Vampire is stuck in the black hole, use Sol.
- Follow the specific damage route shown in the below video to avoid a third cycle:
- You should reach Lvl 12 after this fight.
Once you gain control of Sabata, pick up the coffin and leave the room through the ↙️ exit.
Take two full steps, then use a ![]() Power Nut to drag the coffin back to San Miguel.
Power Nut to drag the coffin back to San Miguel.
Use a second ![]() Power Nut when your buff expires.
Power Nut when your buff expires.
Django Purification
Enable max sunlight, activate the bottom two generators and begin the purification.
![]() Zero Shift onto the coffin after gaining control of Sabata and activate the other two generators.
Zero Shift onto the coffin after gaining control of Sabata and activate the other two generators.
Position Sabata to the south of the coffin to manipulate Django to move upwards.
![]() Zero Shift upwards and knock him back into the coffin from the north.
Zero Shift upwards and knock him back into the coffin from the north.
Move just north of the coffin and wait for Django to attack one of the generators.![]() Zero Shift in the appropriate direction and shoot Django back into the coffin.
Zero Shift in the appropriate direction and shoot Django back into the coffin.
- If Django goes to a northern generator, shoot diagonally to push him back into the coffin.
- If Django goes to a southern generator, shoot horizontally to push him back into the coffin.
San Miguel (3)
Unequip ![]() Cloud.
Cloud.
Equip ![]() Dark over
Dark over ![]() Sol,
Sol, ![]() Bat over
Bat over ![]() Frost and
Frost and ![]() Mouse over
Mouse over ![]() Flame.
Flame.
Raise AGIL to 25, and put your remaining stat point into STRG.
Visit the coffin shop in the southwest corner of town and buy the ![]() Elefan coffin (160 solls).
Elefan coffin (160 solls).
Refill energy to 100%, attempt to summon moonbugs before starting the energy charge to offset the damage Black Django takes from sunlight.
Proceed to the piledriver screen.
Kill the two Dark Roots on the right with spear and ![]() Dark, then leave through the way you came in.
Dark, then leave through the way you came in.
Keep re-entering the piledriver screen and kill thirty (30) more Dark Roots this way.
You will need to refill energy during this grind, summon moonbugs before the energy refill to once again offset the sunlight damage.
You should reach Lvl 15 during this grind.
Proceed through the ↘️ exit and break the two blocks to the south.
Kill the southern Dark Root with spear and ![]() Dark, then proceed through the furthest ↗️ exit.
Dark, then proceed through the furthest ↗️ exit.
Dark City
Put all stat points into STRG.
Open the first chest for a ![]() Sunscreen.
Sunscreen.
In the next room, kill the Bandit with sword and ![]() Dark, then proceed through the ↗️ exit.
Dark, then proceed through the ↗️ exit.
Go around and proceed through the ↘️ narrow passage.
Proceed through the ↙️ exit, then the last exit at the bottom.
Kill the Bandit with sword and ![]() Dark, then proceed through the ↗️ exit, then again in the same direction.
Dark, then proceed through the ↗️ exit, then again in the same direction.
In the room with the Zombies, proceed through the ↖️ exit.
After the cutscene, refill energy (Summon moonbugs before starting energy charge to offset sunlight damage).
Proceed through the ↖️ exit.
Proceed through the second door, then use ![]() Mouse to proceed through the mousehole.
Mouse to proceed through the mousehole.
Use hammer to activate the lever, then take the stairs.
Kill both Green Slimes with sword for EXP.
Proceed through the ↙️ exit, then take the stairs.
Use ![]() Bat to go through the window, then take the first exit.
Bat to go through the window, then take the first exit.
Un-transform immediately and proceed through the ↙️ exit.
Use ![]() Mouse before getting on the elevator, then proceed through the ↗️ mousehole.
Mouse before getting on the elevator, then proceed through the ↗️ mousehole.
Kill the Green Slime for EXP, then proceed through the ↘️ exit and push the block.
Push the Green Slime out of your path, then use ![]() Mouse to go back through the mousehole.
Mouse to go back through the mousehole.
Take the elevator without being shapeshifted, then proceed through the ↘️ exit.
Use ![]() Bat to fly over the water and proceed through the ↖️ door.
Bat to fly over the water and proceed through the ↖️ door.
Open the blue chest for a ![]() key, then leave the room.
key, then leave the room.
Backtrack and proceed through the ↘️ exit, then through the first ↗️ door.
Proceed upstairs, kill both Green Slimes with sword and open the locked ↘️ door.
You should now be Lvl 16.
Kill the two Gusts with sword for EXP, then proceed down the ↙️ stairs.
Once outside, proceed through the ↖️ exit nearby.
Use ![]() Bat to go over the water, then proceed through the ↗️ door.
Bat to go over the water, then proceed through the ↗️ door.
Use ![]() Bat before getting on the elevator, then proceed through the ↖️ window.
Bat before getting on the elevator, then proceed through the ↖️ window.
Take the first exit, then go downstairs and through the ↘️ door to push a block.
Backtrack inside but do not take the stairs, instead use ![]() Bat to fly over the narrow path and proceed through the ↙️ exit.
Bat to fly over the narrow path and proceed through the ↙️ exit.
Use ![]() Bat to fly over the water and switch trap, then open the chest for a
Bat to fly over the water and switch trap, then open the chest for a ![]() key.
key.
Proceed through the ↘️ exit, push the block and go through the second ↗️ door.
Unlock the next ↗️ door, then use ![]() Bat to fly over the narrow paths.
Bat to fly over the narrow paths.
Avoid the ghosts and use ![]() Bat to proceed through the ↘️ window.
Bat to proceed through the ↘️ window.
Go left and proceed through the last exit.
Un-transform immediately, then hug the left wall to go behind the Gust.
Knock on the wall after passing the first corner to distract the second Gust, then hug the left wall and knock on the wall inside the skylight to cluster all three.
Open the blue chest for a ![]() key.
key.
When all of the Gusts are in the skylight, enable 9 sunlight to deal 270 damage to them, then immediately disable sunlight before using sword to finish them off.
Use ![]() Bat to proceed through the ↖️ window.
Bat to proceed through the ↖️ window.
If you accidentally killed the Gusts with sunlight or they killed each other by detonating, you can farm the Green Slime through the ↗️ exit to make up the missing EXP.
Proceed through the first exit, then go downstairs and through the ↘️ door to push another block.
Backtrack and take the elevator, proceed through the ↙️ exit, then go ↘️ and ↗️ to unlock the next door.
Refill energy on the Solar Station and put all stat points into STRG before taking the elevator.
Select the first option during the dialog.
Cheyenne
- Use
 Dark, keep hitting him non-stop.
 - Try to aim in the correct direction so that hits counts as back hits for higher damage.
- Try to cause him to flinch as he pulls out new weapons to keep him disarmed.
- When he attempts to use an item to heal/buff himself, attack him to force him to drop it.
Refill energy whilst waiting for the elevator to leave the room.
Use the warp circle, then use a ![]() Warp Leaf to leave the dungeon.
Warp Leaf to leave the dungeon.
Proceed through the ↙️ and ↖️ exits to backtrack to San Miguel.
Talk to Cheyenne to unlock the weapon shop.
Buy two ![]() Broadswords and equip the
Broadswords and equip the ![]() Gladius.
Gladius.
Place the two ![]() Broadswords in the first two inventory slots, and your
Broadswords in the first two inventory slots, and your ![]() Short Sword in the third slot.
Short Sword in the third slot.
Go to the forging house and forge a ![]() Long Sword using the second
Long Sword using the second ![]() Broadsword +
Broadsword + ![]() Short Sword.
Short Sword.
Katana Manip
Exit and re-enter the forging house.
Save and soft-reset (A+B+Start+Select).
From soft-reset, RNG advances every frame. Use an external timer like EonTimer to assist in the manipulation.
Set the system time to 2004/05/05 23:56.
Talk to Smith and begin selecting your weapons to forge with.
Select the ![]() Broadsword and
Broadsword and ![]() Long Sword in the first two slots.
Long Sword in the first two slots.
Start the forge at these precise times after soft-reset has taken place, for the respective platforms:
- Emulator: 34.07~ seconds
- Nintendo DS: 34.30~ seconds
- Game Boy Player: 34.23~ seconds
Do precisely 15 strikes in this forge.
Get at least two GREATs to guarantee an SP weapon.
If every hit is a GREAT, you will increase the frame window from 8 to 12.
If the start of forge was timed correctly, the resulting weapon will become a ![]() Katana SP.
Katana SP.
Backtrack through the ↘️↗️↗️ exits to Dark City.
If the EXP route has been followed correctly, you will reach Lvl 17 by this point.
Do not proceed if you have not reached this level yet, kill Dark Roots/Yellow Slimes to reach Lvl 17 or you will be unable to equip the ![]() Katana.
Katana.
Dark City (2)
Take the warp circle and unlock the ↗️ door.
In the room with Gusts, take the stairs, then proceed through the ↘️ exit.
In the next room, use ![]() Bat to fly through the window on the left, then keep using
Bat to fly through the window on the left, then keep using ![]() Mouse, go to the right (across the wood), then use
Mouse, go to the right (across the wood), then use ![]() Bat to fly through the last window.
Bat to fly through the last window.
Push the wooden block to open the path before proceeding through the ↗️ door.
Continue downstairs, ignore all enemies.
Refill life/energy before entering the boss fight.
Red Durathror
- 1st phase:
- Equip the
 Katana as the Dark Roots are spawning to react to where the bulb appears.
 - Hit the bulb ten times with Dark before it has a chance to attack.
- Equip the
- 2nd phase:
- Hit the correct bulb; look for the vibrating bulb, or you can use
 Bat to see which one it is.
 - Use Dark x3 once the bulb is opened.
- Hit the correct bulb; look for the vibrating bulb, or you can use
- 3rd phase:
- Hit once with no element, then once with Dark to end each cycle quickly.
- Hit her right as she spawns to cancel her attacks.
- Hit once with no element, then once with
- You should reach Lvl 18 after this fight.
Put all stat points into STRG; you should now be at 50 STRG/25 AGIL, which will increase your coffin-drag speed.
Drag the coffin and solve the puzzles.
After solving the puzzle with 2 wooden blocks, leave the coffin behind and walk onto the ↗️ staircase.
Use a ![]() Warp Leaf to leave the dungeon.
Warp Leaf to leave the dungeon.
Save the game and soft reset (A+B+Start+Select).
Set the system time to 2004/08/31 19:00.
The coffin is now in the piledriver screen.
Proceed through the southern ↖️ exit to go to the piledriver screen.
Do not enter the piledriver screen through the northern entrance or you will softlock the game.
Red Durathror Purification
Activate one generator and start the purification.
Enable max sunlight during the cutscene.
After regaining your powers, replace ![]() Mouse with
Mouse with ![]() Sol, then finish the purification.
Sol, then finish the purification.
Choose the second dialog option after the purification.
San Miguel (4)
Talk to Violet to trigger Nero, then go to Cheyenne’s shop.
Talk to him to get the ![]() Dash magic.
Dash magic.
Use this for movement whenever possible.
Equip ![]() Dash over
Dash over ![]() Bat.
Bat.
Go outside follow Nero.
Open this hidden chest for a ![]() Warp Leaf:
Warp Leaf:
You should now have three (3) ![]() Warp Leaves.
Warp Leaves.
Follow Nero through the ↖️ exit.
Use ![]() Dark to destroy the Dark Root in front of the Treasury (Enables Gust spawns on this screen for EXP grinding), then follow Nero and proceed through the ↖️ exit to the Aqueduct.
Dark to destroy the Dark Root in front of the Treasury (Enables Gust spawns on this screen for EXP grinding), then follow Nero and proceed through the ↖️ exit to the Aqueduct.
Aqueduct
Go inside the Aqueduct to receive ![]() Earth.
Earth.
Disable sunlight before leaving through the ↘️ exit.
Kill the first Gust outside Aqueduct with ![]() Sol, then use
Sol, then use ![]() Dark to destroy the ↗️ Dark Root and backtrack to Cathedral.
Dark to destroy the ↗️ Dark Root and backtrack to Cathedral.
Cathedral (2)
Proceed through the ↗️ exits.
Open the red chest near the main entrance for a ![]() Warp Leaf.
Warp Leaf.
Replace ![]() Sol with
Sol with ![]() Grow, then use it on the lily pad to proceed through the ↖️ exit.
Grow, then use it on the lily pad to proceed through the ↖️ exit.
Use ![]() Grow on the lily pads to reach a chest and get
Grow on the lily pads to reach a chest and get ![]() The Magician.
The Magician.
Use a ![]() Warp Leaf to leave.
Warp Leaf to leave.
Backtrack to Dark City, go through the piledriver screen on the way and kill all four Dark Roots with ![]() Dark to disable their respawns.
Dark to disable their respawns.
Dark City (3)
Take the warp circle and proceed through the ↗️ door.
Proceed to where you fought Durathror, then backtrack along the route you took the coffin through.
Once outside, proceed through the first entrance.
Element Puzzle
Equip ![]() Flame,
Flame, ![]() Frost,
Frost, ![]() Cloud and
Cloud and ![]() Earth.
Earth.
Use ![]() Flame on the bottom block.
Flame on the bottom block.
Push the iron block like this:
Use ![]() Earth to delete the floating block next to the iron block, then use sword and
Earth to delete the floating block next to the iron block, then use sword and ![]() Cloud to push the top block once ↘️.
Cloud to push the top block once ↘️.
Push the iron block in the hole.
Use ![]() Cloud to push the bottom block in these directions:
Cloud to push the bottom block in these directions: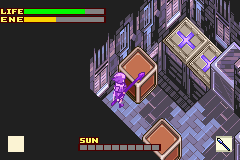
- ↖️ (sword)
- ↗️ (spear)
- ↖️ (spear)
- ↖️ (sword)
Now use ![]() Cloud on the other block:
Cloud on the other block: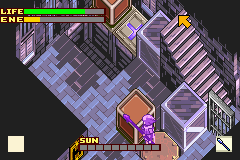
- ↘️ (sword)
- ↗️ (sword)
- ↖️ (spear)
Now use ![]() Cloud on both blocks:
Cloud on both blocks:
- ↗️ (spear)
Use spear and ![]() Frost to lower both blocks at once.
Frost to lower both blocks at once.
Use your remaining ![]() Solar Nut to refill energy.
Solar Nut to refill energy.
Equip ![]() Sol,
Sol, ![]() Mouse,
Mouse, ![]() Transform and
Transform and ![]() Dash, then proceed up the stairs.
Dash, then proceed up the stairs.
Use ![]() Sol to kill the Gusts before proceeding through the ↙️ exit.
Sol to kill the Gusts before proceeding through the ↙️ exit.
Go outside, then back into the room where you killed the Gusts (Required to enable spawns on a later screen).
Proceed back outside through the ↙️ exit, then proceed through the ↖️ exit after the narrow path.
Use ![]() Sol to kill the Gusts before using
Sol to kill the Gusts before using ![]() Mouse to go through the ↗️ mousehole.
Mouse to go through the ↗️ mousehole.
Open the chest to get ![]() The Hermit.
The Hermit.
During the cutscene, choose the first option:
Replace ![]() Sol with
Sol with ![]() Dark and
Dark and ![]() Mouse with
Mouse with ![]() Dynamite, then use a
Dynamite, then use a ![]() Warp Leaf to leave.
Warp Leaf to leave.
You should be Lvl 19 by this point.
Proceed through the ↙️ exit and backtrack to the Remains.
Remains (2)
In the Clay Golem room, proceed through the ↗️ exit, then the second ↖️ exit.
Proceed through the ↗️ exit (do not take the stairs).
Use ![]() Dynamite on the wall next to the Zombie on the top-left, then proceed.
Dynamite on the wall next to the Zombie on the top-left, then proceed.
Kill the Dark Root with ![]() Dark and open the chest to get
Dark and open the chest to get ![]() The Hierophant.
The Hierophant.
Replace ![]() Dynamite with
Dynamite with ![]() Sol, then use a
Sol, then use a ![]() Warp Leaf to leave.
Warp Leaf to leave.
Backtrack to San Miguel, then disable sunlight before proceeding through the ↖️ exit.
Kill the first Gust with ![]() Sol, then leave through the ↘️ exit to respawn it.
Sol, then leave through the ↘️ exit to respawn it.
Kill it two (2) more times, then proceed through the ↖️ exit into Aqueduct.
You should now be Lvl 20.
Aqueduct (2)
Open the door, then proceed.
Purple Slimes Trap
- Use Red Django, no element and sword.
Octopi Trap
- Equip Equip
 Cloth Armor.
 - Put all stat points into STRG.
- Replace Sol with Flame.
- Use Flame, after the fight refill life/energy on the skylight.
Skeleton Fencers Trap
- Use Black Django and Dark.
- Walk into the center of the room to cluster them, then kill all three at the same time.
- You should reach Lvl 21 after this fight.
Refill life/energy and put all stat points into STRG before entering the boss.
Blue Dvalinn
- Use Flame.
- Refill life/energy on the skylight as needed.
- When she charges you, time your hit so that it cancels her attack.
- You can hit the oil bullets with Flame to destroy them before they land.
- If she’s at 1 HP and far away, shoot her with
 Elefan coffin (Black Django and
  Sleeping).
 - You should reach Lvl 22 after this fight.
Put all stat points into STRG.
Replace ![]() Flame with
Flame with ![]() Earth.
Earth.
Use a ![]() Warp Leaf to leave, then backtrack to San Miguel.
Warp Leaf to leave, then backtrack to San Miguel.
San Miguel (5)
Go into the clockhouse and talk to the NPC.
Keep talking, then change the system time to 2004/09/30.
Go to Lita’s shop:
- Sell your entire inventory except for the
 Sunscreen and
  The Tower (塔) if you have it
 - Buy:
- 2
 Speed Nuts
 - 2
 Power Nuts
 - 1
 Warp Leaf
 - 8
 Solar Nuts
 - Fill the remaining inventory slots with
 Earthly Nuts
 - If you have The Tower (塔) in your inventory, leave one slot free for a
 Bearnut in Spiral Tower
- 2
Proceed to the piledriver screen.
Blue Dvalinn Purification
Activate all four generators and start the purification.
Use ![]() Earth during this purification, be careful of the bubble streams as they deal heavy damage.
Earth during this purification, be careful of the bubble streams as they deal heavy damage.
Proceed through the ↗️ exit, break the wooden block with hammer to continue.
Disable sunlight to open Sabata’s half of Spiral Tower.
Enable sunlight to open Django’s half of Spiral Tower.
Spiral Tower
Hug the top corner to avoid the Black Slime and take the stairs, then proceed through the ↘️ exit.
Slide along the wall over the narrow walkway (This is no slower than transforming) and push the block.
Backtrack and fall through the trapdoor on the left side of the room.
Use spear to hit the switch through the Black Slime.
Push the block and use the magic circle to switch to Sabata.
Use a ![]() Speed Nut as soon as you gain control.
Speed Nut as soon as you gain control.
Proceed upstairs, using ![]() Zero Shift to run through enemies.
Zero Shift to run through enemies.
On the way, step on the switch to open a gate for Django, then proceed.
Step on the switch outside, then use the magic circle to switch back to Django.
Upon gaining control of Django, hold Right on the D-pad WITHOUT using ![]() Dash, with the
Dash, with the ![]() Cloth Armor equipped you will consistently dodge the Black Slime.
Cloth Armor equipped you will consistently dodge the Black Slime.
Proceed upstairs twice, whilst opening the red chest by the second staircase for an ![]() Earthly Nut.
Earthly Nut.
Kill the first Cockatrice with ![]() Earth, then proceed upstairs.
Earth, then proceed upstairs.
Proceed through the ↘️ exit, then re-enter the room.
Knock on the upper pillar to attract all three Cockatrices, then kill them all with ![]() Earth to reach Lvl 23.
Earth to reach Lvl 23.
Proceed through the ↘️ exit and step on the switch to activate the elevator.
Stand on the elevator, then before it leaves the room:
 Transform into Black Django and select Dark.
- Replace
 Earth with Sol.
 - Put all stat points into STRG.
Sword+ Trap
- Use Black Django and Dark.
- Killing the Sword+ before it teleports is very difficult, but possible with accurate play.
- Use Transform immediately after getting the kill to switch to Red Django before the door opens.
- You should reach Lvl 24 after this fight.
Proceed through the ↖️ exit.
If you have ![]() The Tower (塔) in your inventory, use
The Tower (塔) in your inventory, use ![]() Mouse to go through the ↗️ mousehole and pick up a
Mouse to go through the ↗️ mousehole and pick up a ![]() Bearnut.
Bearnut.
Once outside, take the stairs and proceed ↗️ indoors.
Use ![]() Sol to kill the first Leys once you get indoors.
Sol to kill the first Leys once you get indoors.
Avoid the Stone Golems and proceed through the ↘️ exit, then activate the lever with spear and switch to Sabata.
Take the elevator, then use a ![]() Speed Nut before leaving the elevator.
Speed Nut before leaving the elevator.
Proceed upstairs at the bottom of the room.
Shoot the enemy outside (where Django is), then backtrack and take the other stairs.
Kill the Ghoul to get a key and open the door.
Before going outside, make sure you have some energy.
Once outside, shoot the lever and use the ↖️ magic circle to switch back to Django.
Proceed through the ↖️ exit.
Refill energy whilst taking the elevator, then proceed through the ↘️ exit.
Activate levers and switch characters during this puzzle to activate the brown lever.
During Sabata’s segments, fire a shot ↘️ from the magic circle to hit the lever and avoid movement.
Ensure that the floor has changed before switching back to Django after doing this.
As Django, hit the rusty lever with hammer, then push the block and backtrack inside.
Activate the lever to free Sabata.
Proceed through the ↖️ exit.
Put all stat points into STRG, then replace ![]() Sol with
Sol with ![]() Rising Sun and use it to skip the bomb puzzle.
Rising Sun and use it to skip the bomb puzzle.
Open the blue chest for a key, then proceed through the ↘️ door.
Take the stairs, then proceed through the ↘️ exit to go outside.
Taking the floating platform as Red Django is fastest, but is extremely dangerous, and a minor error will kill you.
Use ![]() Bat to avoid falling off the platform if not confident. If no armor is equipped, the flame jets will easily kill you.
Bat to avoid falling off the platform if not confident. If no armor is equipped, the flame jets will easily kill you.
Activate the switch, then backtrack inside and proceed upstairs.
Before using the magic circle, check the hint panel for the number and the kanji:
Use the magic circle to switch to Sabata.
Go back indoors, then proceed up the elevator on the south side of the room.
Sabata Block Puzzle
Use a ![]() Power Nut:
Power Nut: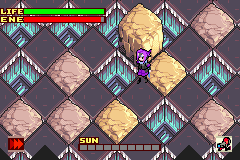
After this, check the hint panel and switch back to Django:
Proceed through the gate and push the iron block based on the hint panels and the statue.
Note that Django and Sabata’s hint panels refer to each other’s blocks, inverting the solution as read.
For instance, 北2 東4 means North 4, East 2, NOT North 2, East 4.
北 = North, 南 = South, 東 = East, 酉 = West.
![]() Transform into Black Django before the final block push.
Transform into Black Django before the final block push.
Axe+ Trap
- Use Black Django and Dark.
- Do NOT hit the Axe+ more than twice before it gets close enough to use a regular attack, or you will trigger a dangerous attack that will likely instantly kill Django.
- Use Transform immediately after getting the kill to switch to Red Django before the cutscene plays.
- You should reach Lvl 25 after this fight.
Backtrack inside and proceed upstairs until you take an elevator.
The outdoors screen has solar wind that will push you if using sunlight.
Use the solar walkway with <=8 Sunlight to go straight to the next elevator.
Put all stat points into STRG, then equip ![]() Dash,
Dash, ![]() Sol,
Sol, ![]() Frost and
Frost and ![]() Cloud.
Cloud.
Use ![]() Sol to kill the first two Leys, then activate the lever.
Sol to kill the first two Leys, then activate the lever.
Kill the Leys again, then use a ![]() Power Nut.
Power Nut.
Refill energy to 100% before pushing the block, then proceed downstairs.
Push the left block ↘️↘️, then the other block ↙️↘️ so that they’re next to each other:
Push the floating block with spear and ![]() Cloud ↗️.
Cloud ↗️.
Break the top stone block so that you can push the bottom one to cross and reach the floating block again:
Push the floating block onto the switch with spear and ![]() Cloud, then use
Cloud, then use ![]() Frost.
Frost.
Replace ![]() Frost with
Frost with ![]() Rising Sun.
Rising Sun.
Proceed through the ↘️ exit.
As Sabata, proceed upstairs.![]() Zero Shift through the southern Black Slime and proceed upstairs.
Zero Shift through the southern Black Slime and proceed upstairs.
Shoot in the ↗️ direction to activate the final lever.
Backtrack downstairs and proceed through the ↖️ exit to reach Django.
If Django’s final puzzle was solved correctly, you should have at least 100 energy. Do not enter the boss fight without having at least this much.
During the dialog, choose the second dialog option to avoid a Game Over.
Black Dainn
- 1st phase:
- Use
 Rising Sun for a massive hit, then use two Solar Nuts to restore energy.
 - Stay away so that Sabata doesn’t get hit.
- When Dainn spawns dark orbs, destroy them with Sol.
- Don’t attack Dainn, instead, focus on good positions to avoid swords easily.
- When Dainn is stuck in the black hole, use Sol.
- Use
- 2nd phase:
- Use Sol to hit Dainn three times, then stand in this precise position to avoid his dark energy attack and keep attacking:
- Use
- Attack constantly to kill him before he goes underground.
- You should reach Lvl 27 after this fight.
Use a ![]() Warp Leaf to leave.
Warp Leaf to leave.
Save the game and soft-reset.
Change the system time to 2004/10/29 22:xx.
Backtrack ↙️ to the piledriver screen.
Black Dainn Purification
Activate all four generators with ![]() Sol and enable max sunlight.
Sol and enable max sunlight.
Use Red Django and ![]() Sol.
Sol.
Do not get hit by the dark orbs, they will one-shot you.
You will destroy them in two hits, so slash them down during downtime.
Skip the chest after finishing the purification.
Equip ![]() Dynamite,
Dynamite, ![]() Cloud,
Cloud, ![]() Dash and
Dash and ![]() Frost.
Frost.
Backtrack ↗️ to Spiral Tower.
Undead Zone B1
In the room on the ↖️ side, knock on the wall to lure the Skeletons, avoid being seen.
Proceed through the ↗️ exit, break the cacti to proceed.
Knock on the central pillar near the first Skeleton so that it looks in another direction, then proceed.
Skip the next puzzle by using ![]() Dynamite after entering the room.
Dynamite after entering the room.
In the next room, knock on the wall near the first Skeleton.
After the stairs, run in the ↘️ direction to avoid being seen.
B1 Block Puzzle
Refill life/energy to 100% on the skylight before leaving the room.
THIS IS THE FINAL SKYLIGHT AVAILABLE IN THE ROUTE.
In the next room, use <=8 sunlight to enable the solar walkway and proceed through the ↖️ exit.
Hit the Skeletons from behind and ![]() Dash during their damage animation so that they don’t see you.
Dash during their damage animation so that they don’t see you.
Replace ![]() Frost with
Frost with ![]() Transform and
Transform and ![]() Dynamite with
Dynamite with ![]() Bat.
Bat.
Use Black Django and ![]() Bat to fly over the traps and get the key, then
Bat to fly over the traps and get the key, then ![]() Transform back into Red Django and proceed through the door.
Transform back into Red Django and proceed through the door.
After entering the next room, knock on the wall directly in front of you to lure the Skeletons.
Have <=8 sunlight during the next room to enable the solar walkway.
Push the block and get the key, then backtrack to the first elevator (↘️).
Refill energy on the Solar Station and open the ↗️ door.
Sand Worm Trap
- Use
 Cloud on the head to stun it, then hit the head up to 9 times before running away.
 - Pray it doesn’t move onto your position and fire a rock whilst underground.
- Attack the body at least once after the tail starts attacking to ensure that it will dive at you after burrowing.
- Time an attack on the head as it dives at you to stun it again, then finish the fight.
- You should reach Lvl 29 after this fight.
If you have ![]() The Tower (塔), you can “skip” this fight by hitting the head 3-4 times, then using a
The Tower (塔), you can “skip” this fight by hitting the head 3-4 times, then using a ![]() Bearnut followed by
Bearnut followed by ![]() The Tower (塔) to instantly kill it.
The Tower (塔) to instantly kill it.
Open the blue chest for a ![]() key, then leave using the ↙️ elevator.
key, then leave using the ↙️ elevator.
Refill energy on the Solar Station, then unlock the ↙️ door and proceed.
Undead Zone B2
Equip ![]() Dash,
Dash, ![]() Flame,
Flame, ![]() Earth and
Earth and ![]() Dynamite.
Dynamite.
Put all stat points into STRG.
Proceed through the ↘️ exit.
Use ![]() Dynamite by the first torch.
Dynamite by the first torch.
Knock on the central wall to lure the Skeleton Fencer, then use ![]() Flame to light the other torches to open the gate.
Flame to light the other torches to open the gate.
In the third dark room, light the torches on the moving platforms with spear and ![]() Flame.
Flame.
Have <=8 sunlight to enable the solar walkways in the next room.
Break the wooden blocks and proceed through the ↗️ exit.
After the rooms with Skeletons, proceed up the stairs and refill energy on the Solar Station.
Lich Trap
- Be aware of your surroundings at all times.
- Use Earth and hit the Lich from behind.
- You can destroy the lightning balls with Earth.
- Avoid the summons and clouds.
- Use Solar Nuts to refill energy.
- You should reach Lvl 31 after this fight.
Open the blue chest for a ![]() key, then proceed through the ↙️ exit and take the elevator.
key, then proceed through the ↙️ exit and take the elevator.
Undead Zone B3
Proceed through the ↖️ exit and activate the lever.
Backtrack, then proceed through the ↙️↖️↖️ exits to activate another lever and spawn an ice block.
Proceed through the ↗️↘️↙️ exits.
Use ![]() Dynamite here (Turn sunlight down to a lower level to minimise damage taken), then use the first wall to slide onto this spot and get pushed by the Dynamite:
Dynamite here (Turn sunlight down to a lower level to minimise damage taken), then use the first wall to slide onto this spot and get pushed by the Dynamite:
Slide directly downwards, then towards the lever and activate it.
Proceed through the ↗️↘️ exits to backtrack to the first room.
Refill energy on the Solar Station, then proceed through the ↙️↙️ exits.
Slide ↙️↘️ on the ice, then wait a full second before sliding directly left in order to avoid hitting the Centipede.
Slide directly up onto the slope, then proceed through the ↖️ exit.
Proceed through the ↙️ gate, then use the plant to reach the next ↙️ exit.
Put all stat points into STRG before taking the platform.
Serpent Trap
- Use Flame and sword, you can hit the tail with precise hits.
- Use
 Dynamite whilst the Serpent is underwater to force it to jump at you.
 - Only aim for the head and tail.
- Break the bubbles to force it to jump at you.
- You should reach Lvl 33 after this fight.
Open the blue chest for a ![]() key, then take the new platform.
key, then take the new platform.
Use ![]() Flame if you have remaining energy to melt the ice block, then continue to backtrack to the first room and open the ↘️ door.
Flame if you have remaining energy to melt the ice block, then continue to backtrack to the first room and open the ↘️ door.
Undead Zone B4
Refill energy on the Solar Station, then proceed through the ↗️↘️ exits.
B4 Block Puzzle
Push the stone block and use ![]() Flame on the floating block.
Flame on the floating block.
Put all stat points into STRG. You should now be at 95 STRG.
Replace ![]() Flame with
Flame with ![]() Frost and
Frost and ![]() Dynamite with
Dynamite with ![]() Cloud.
Cloud.
Push the floating block with spear and ![]() Cloud ↗️↘️:
Cloud ↗️↘️:
Break the stone block with ![]() Cloud and push the iron block ↘️.
Cloud and push the iron block ↘️.
Use ![]() Earth to delete the floating block.
Earth to delete the floating block.
Walk onto the switch.
Backtrack and proceed through the ↗️↘️↘️ exits.
Equip ![]() Frost,
Frost, ![]() Dash,
Dash, ![]() Transform and
Transform and ![]() Sleeping.
Sleeping.
Do not walk onto the platform, instead stand at the corner edge and use spear and ![]() Frost to extinguish the fire:
Frost to extinguish the fire: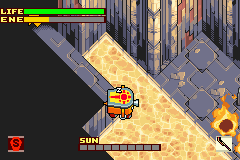
Then use ![]() Sleeping and
Sleeping and ![]() Elefan coffin to shoot the lever.
Elefan coffin to shoot the lever.
Backtrack and proceed through the ↙️ exit.
Open this hidden chest on the way for a ![]() Solar Nut:
Solar Nut: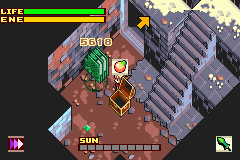
If life/energy are both low, this room is ideal for refilling by attacking the solar bamboo. Avoid absorbing dark bugs.
Proceed through the ↘️↘️ exits, then take the stairs.
Proceed through the ↙️↘️exits.
Take the floating platforms across the lava, open the right-hand red chest on the way for a ![]() Solar Nut.
Solar Nut.
Proceed through the ↖️↖️ exits.
Refill energy on the Solar Station.
Lich+ Trap
- Use
 Frost and hit the Lich+ from behind.
 - Once it begins its rotating attack, damage boost on its back and immediately let go of directional input to land in the correct spot to avoid getting hit.
- Use Solar Nuts to refill energy.
- You should reach Lvl 35 after this fight.
Use your remaining ![]() Solar Nuts and
Solar Nuts and ![]() Earthly Nuts to refill life/energy, then raise STRG to 99.
Earthly Nuts to refill life/energy, then raise STRG to 99.
You can put the remaining stat points into VIT if you want, but this is not faster.
Replace ![]() Sleeping with
Sleeping with ![]() Dark.
Dark.
Proceed through the ↖️ exit, then take the elevator.
Undead Zone B5
Take the single exits, this map is linear.
The room with the Centipede is dangerous if your life is low, but dying here will refill your life to 50% at relatively low time cost.
There is a solar walkway on the final screen, so have <=8 sunlight before entering.![]() Transform into Black Django and select
Transform into Black Django and select ![]() Dark before entering the final fight.
Dark before entering the final fight.
Jormungandr
- Open the menu immediately and use the Sunscreen to avoid taking damage from sunlight.
- You must have at least 1 sunlight during the entire fight.
- Use Black Django and Dark.
- Aim for the eyes until the tongue is out.
- During the first cycle, hit the body several times before attacking the tongue in order to get a more favourable second cycle.
- During the black breath attack, charge some energy and aim to hit the eyes close to the body to get a chance at hitting the tongue and body at the same time.
- During the second cycle, do not hit the body more than 4 times, or you will get a less favourable third cycle.
- Immediately attack the eyes as the third cycle begins, then aim to finish the fight here. At least several more attacks to the body will be required in order to kill whilst attacking the tongue.
During the cutscenes, enable max sunlight.
After the cutscenes, charge energy.
Time ends when Jormungandr’s life bar reaches zero during this final charge.
Boktai 3
Guides
Resources
Boktai 3: Any% Route
Important
This guide is currently being rewritten because of route improvements.
Feel free to contribute on Discord or on the GitHub repository.
About this guide
Directions for paths and exits will use ↖️, ↗️, ↙️ and ↘️.
Before starting
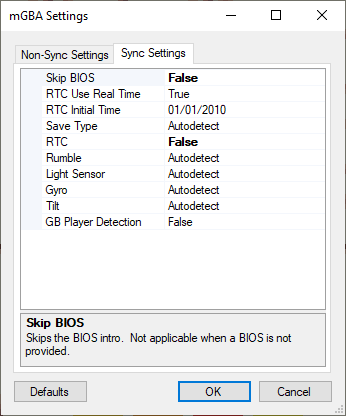
When playing on BizHawk, load a ROM, go to GBA > Settings and make sure “Skip BIOS” and “RTC” are set to “False”.
This requires at least BizHawk v2.6.3 and makes sure that Emulator runs are comparable to console and that you can properly set the time in-game.
Solar Bank interest rate manip
The goal of this manip is to have the interest rate change to 18% during the prologue, which will carry over to San Miguel 1.
By then changing the time via the Clock Tower at that point, we’ll go from ~1400 to ~7900 Solls.
Add a -2mn47s100ms delay to your timer (AKA LiveSplit).
Note: depending on your setup, you might have to adjust this delay.
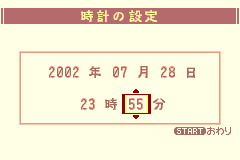
Set the system time to July 28th 2002 at 23:55
- 2002 年 07 月 28 日
- 23 時 55 分
Warning
Upon confirming settings, start the timer.
You now have 2 minutes and 47 seconds to reach the name entry screen.
Failing this will prevent the interest rate manip from working and likely cause you to not have enough Solls to finish the game.
Setting up the Boktai 2 password
Create a new file, select the left option, then enter this password:
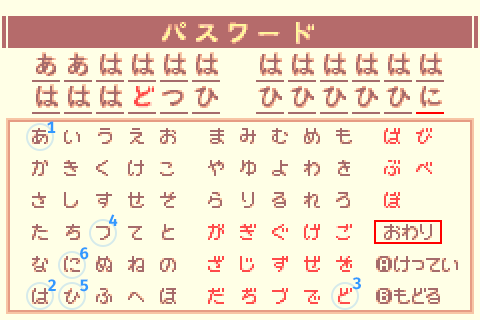
This password grants +2 VIT, +2 SPR, +2 STRG and the following items:
- 1
 “The Sun” Card (recovers all ENE)
 - 1
 Speed Nut
 - 1 “The Moon” Card (recovers all HP)
Use a single character for the player name (saves a few frames each time the name is displayed).
Warning
Wait for the timer to reach 0:00 before confirming and starting a new game.
This is extremely important as starting the game at precisely 23:57:47 IGT will allow the interest rate to change to 18% during the prologue after Sabata gets hit by Vanargandr.
Prologue
The Sabata gameplay segment always lasts 30 seconds. Hold B to make the text go faster and do not do anything else, as it could mess up the interest rate manip by changing RNG.
Sealed Dungeon
After the dialogs, open the chest next to the stairs to get a ![]() Solar Nut.
Solar Nut.
Open the menu, change text speed to Fast (A, Down, Right, A):
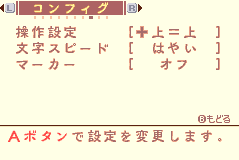
Then go into the inventory, use a ![]() Solar Nut and a
Solar Nut and a ![]() Speed Nut and proceed in the ↗️ direction.
Speed Nut and proceed in the ↗️ direction.
Keep going without stopping.
Once you reach the room with the 2 spiders, go to the right to get the ![]() Wizard Frame, then proceed in the ↖️ and ↗️ directions.
Wizard Frame, then proceed in the ↖️ and ↗️ directions.
Skeleton Trap
- Open the chest for a
 Solar Nut.
 - Open the menu, use the Solar Nut & equip the
 Wizard Frame.
 - Shoot the Skeleton until death.
- You are now Lvl 2 (12 EXP).
Keep going until you reach the “+-shaped room”, take the ↘️ path and step on the weight switch to get the ![]() Gradius.
Gradius.
In the next room, break the first block with the ![]() Gradius and fall to reach the ↖️ exit.
Gradius and fall to reach the ↖️ exit.
Then instead of getting close to the lever, switch to ![]() Wizard Frame and shoot to hit the lever from far away and skip an extra dialog, then proceed in the ↗️ direction.
Wizard Frame and shoot to hit the lever from far away and skip an extra dialog, then proceed in the ↗️ direction.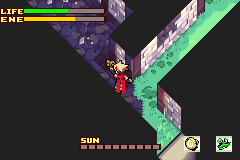
Keep going, and when you reach the room with klorofoluns, get the hidden ![]() Speed Nut on the side of the stairs before proceeding in the ↗️ direction.
Speed Nut on the side of the stairs before proceeding in the ↗️ direction.
Armor Trap
- Set sunlight to max.
- Shoot once with
 Fight Frame.
 - Go on the skylight on the right.
- Aim up, and when the armor is aligned, keep shooting in rhythm to stunlock & prevent it from raising its shield until the trap is over. (approx time ~16.84s)
- You are now Lvl 4 (12 => 136 EXP).
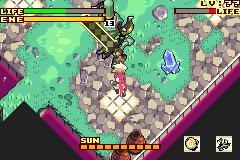
After the trap proceed in the ↗️ direction to leave the dungeon.
Set the sunlight to 0.
San Miguel
Django’s House
- Talk to Violet & choose the first option.
- Get the
 Luna Lens near the doll on the left.
Leave the house and visit the following places.
On Map screens you can use the shoulder buttons to navigate quickly.
Lita - Item Shop
- Talk to Lita
- Open all chests to get 2
 Earthly Nuts & 2
  Healers.
 - Sell the following items for money:
- 4 Earthly Nuts
- 2 Healers
- 1 “The Sun” Card.
- 1 “The Moon” Card.
- 4
Solar Bank | Dark Loans
- Transfer all Solls from the Solar Station to the Solar Bank (~500).
Clock Tower
- Talk to Ennio (old man with glasses).
IGT & Solar Bank interests exploits
The goal of these exploits is to get a big amount of Solls in order to be able to buy every item needed to finish the game. This is affected by the interest rate manip done when starting a new game.
- Talk to Ennio again and change the time to July 21st 2005 10PM. Minutes aren’t important so you can keep these.
- 2005 年 07 月 21 日
- 22 時 XX 分

- Leave the Clock Tower and go to the garage.
- You should now have over 7900 Solls and be able to buy all the necessary items to finish the game.
Garage
- Use a Speed Nut, then talk to the guy in the back.
Lita - Item Shop 2
- Buy 10
 Power Nuts & sort your inventory before closing the shop menu and leaving (3 for Lifeless Town, 7 for Ancient Tree).
Accessory Shop
- Buy
 Iron Clogs &
  Crest of Diamonds.
 - Before leaving, open the chest to get the
 Leather Armor.
Solar Smith
- Talk to Smith.
- Talk to the first panel on the left.
Weapon Shop
- Talk to Cheyenne to get
 Dash magic.
 - Buy 1
 Estoc & 2
  Rapiers (2nd Rapier will be used to skip an additional San Miguel trip just for forging
  Epee later).
Library
- Talk to Lady.
Inn
- Talk to Zazie twice to get the
 Dark Card.
Now exit to the World Map and head to Lifeless Town.
You can check the Boktai 3 resource list for help with the Bike race.
Lifeless Town
Heal with moon bugs & proceed in the ↗️ direction.
When you reach the room with 2 skeletons, take the ↗️ path.
Mission: Open the gate! (Light the torch)
Take the stairs in the upper-↖️ direction.
Open the green chest to get ![]() Flame Lens.
Flame Lens.
Go back and go in front of the gate.
Open the menu and:
- Equip
 Flame Lens & Wizard Frame.
 - Equip Crest of Diamonds & Leather Armor.
- Put all points into STRG
Shoot at the torch and proceed in the ↗️ direction.
Skeletons Trap
- Use Wizard Frame, start by shooting in the back
- (136 => 224 EXP)
Proceed in the ↘️ direction.
Take the upper-↖️ path and take the elevator on the right.
After the elevator go through the ↗️ entrance.
Leave the room and fall on the spikes to reach the ↗️ entrance.
After the cutscene with Trinity, open the green chest for a ![]() +4 Stat card and open the blue chest to get the
+4 Stat card and open the blue chest to get the ![]() Circle Key.
Circle Key.
Do NOT use the Card yet.
Leave the room and take the elevator on the right to go back down.
Take go through the ↘️ path & open the door to proceed in the ↗️ direction.
Armor Trap
- Shoot once with Wizard Frame to force it to shield.
- Get closer and use
 Gradius while aiming Up until the cutscene triggers. (approx time until cutscene: ~15.85s)
 - After the cutscene, spam B as Black Django.
- You are now Lvl 6 (224 => 413 EXP).
Keep going in the ↗️ direction.
In the room with mummies, proceed in the ↗️ direction, then ↖️ twice.
Open the green chest to get the ![]() Hoop Frame.
Hoop Frame.
Go back and proceed in the ↘️ direction.
Lure the ghoul on the weight switch, go through the ↗️ gate, then ↖️.
Mission: Find the yellow key!
- Go up the stairs and dash above the traps to reach the last room.
- Open the left chest first to get a
 Jerky, then open the blue chest to get the
  Triangle Key and trigger the cutscene.
Go through the yellow door, then take the ↗️ path to get a ![]() +2 STRG card.
+2 STRG card.
Go back and take the ↘️ path. After Otenko’s dialogs, take the ↗️ path, then ↖️ twice.
Open the green chest to get the Trial Tire bike part.
Go back once and proceed in the ↗️ direction to reach the boss room.
During dialog, spam A (the 2nd option is faster by a few frame, only worth menuing for TAS).
Open the menu:
- Equip
 Hoop Frame &
  Sol Lens.
 - Use the
 +2 STRG card (it’s the one on the last row).
 - Put all your stat points into STRG.
Then go through the door.
The Count
- Use Hoop Frame on the Count. Do not bother with the windows.
- You are now Lvl 7 (413 => 662 EXP).
Coffin
- Set sunlight to 0.
- Equip Estoc.
- Unequip Gradius.
- Put all points into STRG.
- Use a Power Nut and start going back.
In the room where Otenko summons a solar circle, take the ↙️ path.
Push the wooden block on the weight switch, then go up the stairs (↗️).
- Talk to Snake.
- Buy a
 Redshroom.
Go back and take the ↖️ path.
Then push the iron block and take the ↙️ path.
Once you get past the room where you fought the Armor (brown door), take the ↖️ path and keep going towards the entrance of the dungeon (the other path is for a sidequest and takes longer to go through because of puzzles).
The Count Purification
- Go at the bottom of the piledriver and use Wizard Frame to activate all of them in one shot. During the shot, walk and activate the piledriver as soon as all 4 of them have been hit to skip dialogs.
- Start the purification and use Hoop Frame until the end.
- (662 => 743 EXP)
Ancient Tree
Enter the tree, then take the ↖️ & ↗️ paths.
Ghouls & Bats Trap
- Use Estoc.
- You are now Lvl 8 (743 => 847 EXP).
Proceed through the ↘️ gate & take the elevator to reach 2F.
After the elevator, take the ↙️ and ↖️ paths.
Mission: Make the Solar Roots grow!
Proceed in the ↖️ direction, then ↗️ twice.
On the way kill the 2 purple slimes on the right with ![]() Estoc (847 => 880 EXP).
Estoc (847 => 880 EXP).
Puzzle
- Use a Power Nut.
- Push the first block once in ↗️ & ↖️ directions.
- Push the second block ↗️ once & open the green chest to get the
 Earth Lens.
Go back, kill the 2 purple slimes on the right with ![]() Estoc again (880 => 913 EXP).
Estoc again (880 => 913 EXP).
Killing both slimes twice gives enough EXP to reach lvl 10 earlier but most importantly it also gives TRC which will help for the Hresvelgr quick kill.
Equip ![]() Earth Lens &
Earth Lens & ![]() Fighter Frame.
Fighter Frame.
Once back to the first room, grow the first plant, then alternate between the other 2 plans. Start with the left one because the right one will end the mission once fully grown.
Open the green chest on the left to get ![]() Dragoon Frame, then proceed in the ↗️ direction.
Dragoon Frame, then proceed in the ↗️ direction.
Push the blocks on the weight switches and take the elevator to reach 3F (if you are fast enough, the Power Nut will still be active).
Proceed in the ↙️ twice, then ↖️ and ↙️ once each.
Equip ![]() Iron Clogs to negate the solar wind.
Iron Clogs to negate the solar wind.
On the way, grow the plan to create a shortcut. Hug the left side when dashing towards it to prevent the bulb from exploding. Replenish your energy and re-enter the tree from the ↘️ path, then before going through the ↗️ exit:
- Unequip Iron Clogs.
- Equip Estoc.
- Put all stat points in STRG.
Earth Armor Trap
- Use Estoc to stunlock. You can prevent it from raising its shield if your position is good enough.
- When the shield breaks, move away because the Armor will spin, then go back to stunlocking with Estoc.
- You are now Lvl 9 (913 => 1218 EXP).
Proceed in the ↗️ direction, then take the ↘️ path twice after the cutscene.
As soon as you enter the room, dash towards the nearest platform to take the ↘️ path.
Push the iron block, then go back and take the other platform.
During this room you can set the sunlight to 0 to delay overheating a bit.
Kill the 3 klorofoluns that hovers above the last moving platform with ![]() Hoop Frame (1218 => 1231 EXP).
Hoop Frame (1218 => 1231 EXP).
This isn’t about getting EXP, but rather getting more TRC for the Hresvelgr quick kill.
After the last platform, take the ↘️ path, then ↙️.
Grow the plan near the end of the room, then leave through the ↙️ path.
After the cutscene about the beehive, go in the ↖️ direction and push the elemental blocks to activate the elevator. Take the elevator to reach 4F & proceed in the ↘️ direction.
Spiders & Golem Trap
- Use Estoc.
- Start with the golem, then the spiders. If you’re lucky they will be grouped together after killing the golem.
- You are now Lvl 10 (1231 => 1313 EXP).
Proceed in the ↙️ direction twice.
Replenish life and energy, then set sunlight between 1 and 8 to make the solar platform appear.
Use it to reach the green chest and get the ![]() Chain Mail, then go back inside the tree.
Chain Mail, then go back inside the tree.
Grow the plants to take the ↖️ path, then proceed through the ↙️ and ↖️ paths.
Mission: Find the Red Key!
- Use Fighter Frame & Fire Lens.
- Go on the platform near you and light the 2 torches to open the ↖️ gate (you can shoot the 1st torch by shooting straight UP while on the platform).
- In the next room, light the 5 torches
- Only Fighter Frame allows you to light all 5 in one trip because of the delay between shots and the lack of recoil
- You can shoot the first torch by aiming to the left while on the platform, although sometimes you will hit the mushroom first and have to fire 2 shots.
- Only
- Continue in the ↘️ direction twice.
- Open the hidden blue chest to get the
 Circle Key, then go back and open the door.
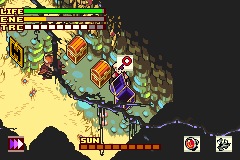
After opening the door, proceed in the ↗️ direction.
Puzzle
- Use a Power Nut.
- See the video below for the optimal solution:
- Take the elevator to reach 5F.
Take the ↘️ path, then ↗️ twice. You should be in a room with ghouls, proceed in the ↖️ direction, then ↙️ 3 times.
Then take the ↖️ path to go outside.
Equip ![]() Iron Clogs, then go through the room, make sure to grow the plant before taking the ↘️ path.
Iron Clogs, then go through the room, make sure to grow the plant before taking the ↘️ path.
Proceed through the ↗️ entry, and take the elevator to reach the boss.
Hresvelgr
- You are expected to be missing 1 TRC block at the start of this fight.
- Use Fighter Frame until the TRC gauge is full (3~4 shots).
- Dash once to get closer to Hresvelgr.
- Use
 Dark Trans and spam B right away, if you’re too slow the boss will begin his wind attack and be invulnerable until it ends.
- Trinity being pushed against the vines around the area will trigger a cutscene, however you can ignore him if that happens.
- Spam B with Dark Trans until the fight is over.
- You are now Lvl 11 (1313 => 1813 EXP).
During the dialog, just hold B and choose the first option.
Coffin
Open the menu and:
- Turn off the sunlight.
- Unequip Iron Clogs.
- Put all points into STRG.
- Use a Power Nut.
Take the elevator and start going back to the entrance of the dungeon.
Use the grown plant outside as a shortcut, then go back inside the tree and take the ↘️ path.
Set sunlight to max, put the coffin on the first weight switch, then use ![]() Dash to step on the other one.
Dash to step on the other one.
Grab the coffin and go through the ↗️ gate, use another ![]() Power Nut after the current one runs out.
Power Nut after the current one runs out.
Then take the elevator to go back to 4F.
Take the ↙️ path, walk on the weight switch to go through the ↘️ gate.
Kill the green slime with ![]() Estoc, use
Estoc, use ![]() Dash and open the green chest for a
Dash and open the green chest for a ![]() +4 Stat card (1813 => 1831 EXP).
+4 Stat card (1813 => 1831 EXP).
Do NOT use the Card yet.
Then take the ↗️ path to reach the elevator and go back to 3F.
Go through the ↘️ gate.
Then take the ↗️ path, walk on the grown plant & the iron block to continue in the ↖️ direction.
You can reach the moving platform without using another ![]() Power Nut, so wait until you’ve reached the other side before using another one.
Power Nut, so wait until you’ve reached the other side before using another one.
Then proceed in the ↖️ direction twice (watch out for the centipede), then ↙️.
In the Earth Armor room open the green chest to get the Einherjar bike part, then take the ↙️ and ↖️ paths to go outside.
Use the grown plant as a shortcut, stay on the left to prevent the bulb from exploding.
Take the ↘️ and ↗️ paths to go back inside the tree.
Proceed in the ↘️ direction (watch out for the golems), then ↗️ twice to take the elevator to go back to 2F.
Go through the ↙️ and ↘️ paths, then go towards the ↗️ path, be careful when passing next to the bulb.
Take the elevator to go back to 1F.
Proceed in the ↖️ direction, then ↙️, ↘️ and ↙️ twice to reach the purification area. The Power Nut effect should stop where the dialog begins.
Hresvelgr Purification
- Go at the bottom of the piledriver and use Wizard Frame to activate all of them in one shot.
- Start the purification and use Hoop Frame until the end.
- During the purification do NOT avoid attacks & take damage on purpose, this will make the next fight a bit faster.
- (1831 => 1945 EXP)
Dash in the ↙️ direction to trigger the next cutscene. Turn off the sunlight when it begins.
The Count
- The Count will do 2 bat attacks: get hit on purpose until you reach critical (red) Life (you can take 4 hits before going into critical state if you are at full Life).
- The Count will now use Blood Rain and trigger the cutscene (by already being in critical state you won’t have to wait as long).
- After the cutscene use B and
 Sol Trans until the fight is over.
Note: unlike Dark Trans, the timing when pressing B matters. Sol Trans has the possibility to attack faster than Dark Trans, however timing is more strict and attacks does NOT stun enemies.
San Miguel (2)
Solar Smith
- Forge Epee ( Rapier +
 Chain Mail).
Django’s House
- Equip the Trial Tire bike (able to drive on mud).
- Equip Einherjar bike part (lower acceleration, higher speed).
Item Shop
- Sell Redshroom.
- Buy 12 Power Nuts (4 for White Forest, 8 for Pirate Island).
White Forest
After the dialog, proceed in the ↗️ & ↖️ directions.
Enter the cave and reach the end to get ![]() Bomber Frame.
Bomber Frame.
Open the menu and:
- Equip Rapier.
- Unequip Estoc.
- Unequip Fighter Frame.
- Equip
 Bomber Frame.
Then go back, and after exiting the cave, take the ↘️ direction twice, then ↗️ twice to enter a cave.
RNG manip
The goal of this RNG manip is to get a ![]() Burning Headband and a total of +12 Strength from cards that would otherwise give points to a random stat.
Burning Headband and a total of +12 Strength from cards that would otherwise give points to a random stat.
Note
Click to open video
Many steps during this manip are time sensitive because of how RNG works!
If you struggle with the manip or have further questions, please contact us and we’ll help you!
- Once inside the cave, save and do a soft-reset (Press A, B, Start and Select at the same time. You can buffer that input while it’s still saving).
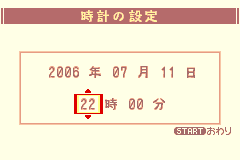
- Set the time to July 11th 2006 10PM (2006/07/11 22:00) to get extra Solls via the Solar Bank interests.
- At this point you shouldn’t need more Solls, but this is a free occasion to get more so you may as well do it.
- Buffer the up + right input to start walking as soon as possible. Keep walking in the ↗️ direction until you are past the chest and very close to the wall.
- With Bomber Frame & Sol Lens, shoot at the Red Slime two times. (1945 => 1971 EXP)
- You must attack the Red Slime as soon as you arrive at the target location. Once it has split, both halves must die at the same time.
- If your timing was right, the Red Slime will have dropped a
 Burning Headband.
 - Get the drop and open the green chest for a +4 Stat card.
- Use any of the three red stat cards you have picked up so far. It should give you +4 STRG.
- Make sure to have sunlight and leave the cave. (Without sunlight it will be snowing outside which changes the RNG)
- Mash Start to open the menu as soon as possible.
- You have about 0.5 seconds to open the menu! Otherwise the RNG will change because the sunlight killed the enemies outside.
- Now use the two remaining +4 Stat cards to get +8 STRG.
- Also equip the Burning Headband.
Now proceed in the ↖️ direction to trigger the cutscene with Trinity.
Mission: Open the cave
- Use Bomber Frame to open the entrance.
Then enter the cave via the ↖️ entrance, then the ↗️ & ↘️, ↗️ & ↘️ directions.
Hotdog & Vamp Trap
- Use Rapier.
- You are now Lvl 12 (1971 => 2155 EXP)
- Open the green chest for
 Frost Lens.
Go back to the entrance of the cave, where the Centipede is. Take the ↖️ entrance.
Puzzle
- Push the 1st block in the ↖️ direction.
- Push the 2nd block ↗️ & ↖️.
Go through the ↗️ entrance, equip ![]() Wizard Frame and
Wizard Frame and ![]() Frost Lens, then shoot and go on the weight switch.
Frost Lens, then shoot and go on the weight switch.
After the cutscene go back in the ↙️, ↘️ & ↗️ directions & keep going.
Frost Armor Trap
- Move towards the center of the room.
- Use Sol Trans.
- You are now Lvl 13 (2155 => 2682 EXP)
After the cutscene with Carmilla, take the ↖️ exit, then ↗️ 3 times. You should now be in a room with a dog: proceed in the ↖️ & ↙️ directions.
Open the green chest near the blue slime to get a ![]() +2 STRG card.
+2 STRG card.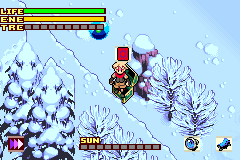
Then take the ↗️ exit 2 times. After the cutscene, slide on the ice to proceed in this ↗️ direction.
Mission: Open the door!
- Proceed in the ↖️ direction twice.
Puzzle
- Push the block on the left towards the ↖️ direction.
- Move in front of the first block on the right.
- Melt it in one shot with Flame Lens & Wizard Frame.
- Push the second block on the right in the ↖️ direction.
- Step on the weight switch on the right.
- Open the chest to get the Circle Key.
- Go back in the ↘️ direction twice & open the door to continue in the ↗️ direction.
Go down the stairs & take the ↖️ exit.
Puzzle
- Use a Power Nut.
- Push the block in front of you in the ↙️ direction like this:
- Walk on the weight switch & push the block at the top on it.
- Walk around & push the 1st bottom block on the weight switch behind it.
- Push the last block (the one that used to in front of you when you entered the room) on the last weight switch.
Proceed in the ↗️ direction & use ![]() Frost Lens to extinguish the candle.
Go back to the puzzle room, then take the ↘️ path once & ↗️ path twice.
Frost Lens to extinguish the candle.
Go back to the puzzle room, then take the ↘️ path once & ↗️ path twice.
Open the menu and:
- Use +2 STRG card.
- Put all stat points in STRG.
Then select ![]() Rapier, replenish life if necessary and keep going.
Rapier, replenish life if necessary and keep going.
Sabata
1st phase
- Lure Sabata by knocking on the block next to you.
- Attack with Rapier to force him to do his spinning attack.
- Evade with Dash, then hit the dark spread with Rapier to stun him.
- Hit Sabata with a 3-hits combo using Rapier.
- Repeat until phase 2.
2st phase
- Move the camera to keep track of Sabata.
- When he stops moving, go to him and attack with Rapier.
3rd phase
- At the start you can hit the dark spread to stun him.
- Then use Dark Trans to finish him.
Coffin
- You are now Lvl 15 (2682 => 3430 EXP).
- Set sunlight to 0.
- Use a Power Nut.
Go back through the same areas.
When you reach the room outside with ice, you can slide using these directions: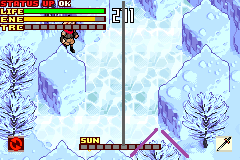
Sabata Purification
- Go at the bottom of the piledriver and use Wizard Frame to activate all of them in one shot.
- Start the purification and use Hoop Frame until the end.
- (3430 => 3553 EXP)
Pirate Island
After the cutscene, circle around the room to keep going in the ↙️ direction.
Then go to the left & open the green chest to get ![]() Cloud Lens before going through the upper ↗️ exit.
Cloud Lens before going through the upper ↗️ exit.
Avoid the golems and take the stairs to keep going until you reach a room with a centipede and a block blocking the ↖️ exit.
Open the menu:
- Put all points into STRG.
- Unequip Rapier.
- Equip Epee.
- Equip
 Cloud Lens.
 - Equip Wizard Frame.
Then break the block and continue ↖️ to board the 1st ship.
1st ship
Go ↙️ and dash onto the moving platform (be quick or you’ll barely miss it), then go ↙️ again and use the ship’s wheel.
After the cutscene, go back and push the block onto the weight switch. Get on the moving platform and take the elevator.
Go to the left and open the chest to get the ![]() Circle Key, then go back down and proceed through the upper ↗️ exit and lower ↙️ exits.
Circle Key, then go back down and proceed through the upper ↗️ exit and lower ↙️ exits.
Keep going and go downstairs, then keep dashing in the ↗️ direction (you can dash on every spike trap safely).
Mission: Open all chests!
After the mission proceed through the ↙️ gate & the ↘️ door, go upstairs and walk past the slimes to go through the ↙️ exit and go downstairs again.
Go through the door and proceed in the ↙️ direction 3 times.
Push the block then go back once and go downstairs, then though the ↘️ and upper ↖️ path.
Wind cannons & Leys Trap
- Select Epee.
- Dash to the left of the blue wind cannon, then destroy it.
- Dash over the weight switch & skylight towards the red wind cannon, then destroy it.
- The leys should have went over the skylight and died, if that’s not the case stand on it and kill them.
- Go through the ↗️ gate.
- (3553 => 3569 EXP)
Puzzle
- Use a Power Nut and follow this:
Go through the gate & downstairs. When you reach the room with burrnuns (flame klorofoluns):
- Equip Flame Lens & Bomber Frame.
- Lure the burrnuns so that they’re grouped together.
- Shoot at them until the TRC gauge is full.
- Hitting enemies with Bomber Frame gives 50 TRC per hit which allows filling the TRC gauge extremely fast as long as there are multiple enemies.
- Flame Lens prevents the burrnuns from dying directly & allows you to shoot again if the TRC gauge is not full. -You are not meant to get any kills or EXP here.
Once the TRC gauge is full, proceed in the ↗️ direction.
Flame Armor Trap
- Use Dark Trans and spam B.
- You are now Lvl 16 (3569 => 4157 EXP).
Continue in the ↗️ direction and get on the moving platform after the dialogs. After the Carmilla cutscene take the magic circle twice. This is extremely important as it will be used later.
Enter through the upper ↗️ entrance and keep going upstairs. Then proceed until you’re outside. Once outside there will be a moving platform at the end of the path: go on it to board the 2nd ship.
2nd ship
REWRITING IN PROGRESS
Resources
Our resource list is divided into multiple parts. On this page you can find our resources that apply to all games while resources that are specific to a single game can be found on these pages:
Emulation
For legal reasons we cannot provide you with a GBA BIOS or Boktai ROMs.
BizHawk
To establish parity between console and emulator, these settings are required for speedruns:
GBA>Settings>Sync Settings, set “Skip BIOS” to “False”.Config>Customize>General, uncheck “Pause when menu activated”.- To simulate a dead battery:
GB>Settings>Sync Settings, set “RTC” to False
(Requires BizHawk v2.6.3+)
mGBA
General
Boktai Hacking Wiki
Aims to collect all technical data about the Boktai video game series.
Also aims to be a database of Boktai romhacking resources, tools, and romhacks.
Sun Miguere
Japanese fanmade website about Boktai in general.
Has a lot of info about all Boktai games. The information is mostly from the Guide Book and therefore also has some errors.
Moon calendar
Useful to find full moon days for routing.
Boss Fight Times
- https://docs.google.com/spreadsheets/d/1deyb5DFe7ALD-8-PNV14nNnPfWPeJAnva_vbZoatuAw/edit?usp=sharing
Lists recorded boss fight durations for multiple Boktai games (currently outdated)
Tools
Sensor patches
BokMagic
Cross-platform data viewer for the GBA Boktai games.
BokPass
- Source code: https://notabug.org/UvHCxXJp/bokpass
- Temporary host: https://boktai.shenef.one/bokpass/
Tool to generate and decode passwords for all Boktai games. The creator is unknown.
Boktai Decompiler
Tested on Boktai 1. Converts function and script bytecode to something similar to C.
Has been replaced by BokMagic.
Communities
Taiyoh Network
Community centered around Boktai Speedrunning.
Kura5
- Discord: https://discord.gg/afXHGy6
- Blog: https://boktai3d.tumblr.com
- Twitter: https://twitter.com/boktai3d
- https://chickenhat.itch.io/kura5-bonds-of-the-undying
A 3D Boktai fangame project that uses live weather in place of a solar sensor.
Boktai Wiki Taskforce
Discord Server for coordinating wiki edits and collecting data.
TeamBN
- Discord: https://discord.gg/hc9AvX2
- Twitter: https://twitter.com/TeamBattleNet
Mega Man Battle Network speedrunning community.
Resources
Guides
- Official Guidebook: https://archive.org/details/boktai-guide
- Delusion Forest (partially outdated since we are not resetting the game anymore)
https://speedrun.com/tsiiyh/guide/rgzcq
Boktai 1 Randomizer
Allows you to randomize various aspects of the game such as chest contents and dungeon locations.
It can also add faster text, adjust the lens exp gain and more.
Data and Mechanics
- Various info, Dungeon Rankings + Items, Game Mechanics
https://docs.google.com/spreadsheets/d/1CmrOd-7Xg0SRDQjFXG4XL_2Uyc0dzMzybtmi5O6pZQs - Enemies & Bosses (HP, Damage, Weaknesses, etc)
https://docs.google.com/spreadsheets/d/1xnNZlHuXt-fazZUIJE_3LxG0CcjAxVf6KhypaqgddyY - Various savestates for practicing / checking stuff
https://drive.google.com/drive/folders/1wFYBgWWnCDt0aHlwtN4hz76q-jXP-GAm - Boss Fight Times Leaderboard
https://docs.google.com/spreadsheets/d/1deyb5DFe7ALD-8-PNV14nNnPfWPeJAnva_vbZoatuAw - Purification mechanics
- Hel 1 mechanics
- Farming mechanics
- Automatic HP refill calc
Route Documents
These can be considered outdated. You probably want to use the ones hosted at Boktai 1 instead.
- (4.7) Generally uses harder strats than the previous routes
https://docs.google.com/document/d/12BsC3FyGxuwsLtAPBJNwhHGNUlE-Jl14yjkuDP00JGs - (4.1)
https://docs.google.com/document/d/1PnEnebZgrqHHxlkMiPTPy9dwjky0U3_vyiZwmpzQrp8 - (JP 4.1) ボクらの太陽「Any%」ルート
https://docs.google.com/document/d/1UjAi3-iWdqIhy1Bb5jPzpBfAHRhnxN7P_KaXJzoiJ0o/edit - (3.3) - old route, easier and teaches you the basics, better for new runners
https://docs.google.com/document/d/1WCV_f-Cm48RVTMeIf7tbhiBUpWiE5FVlmPnUhLMbHOU
Resources
Routes
Some of these can be considered outdated and have been replaced by guides on this website.
- Any% route (GDoc format)
https://docs.google.com/document/d/1scewEgI1c0dUQ9OU8xkKSDB9-POllKf8O9WArfPxqlQ - Any% route (up-to-date, WIP)
https://pastebin.com/dndi7hpV - Outdated route
https://speedrun.com/boktai2/guide/3vlet - Shademan sidequest route
https://docs.google.com/document/d/1J6OYJe3Dtn2zqokFhjQYc4o4sjt7IbDSTV6eazHXOHc
Guides
- Passwords, Solar forging, Movement & Agility, Damage system
https://speedrun.com/boktai2/guides - Official Guidebook
https://archive.org/details/boktai2_guide
Other
- Damage Calculator (WIP)
https://docs.google.com/spreadsheets/d/14MqOuGKF4nYI5yT2MLUuy4nnpZAjhhNnHI9PUslh3Mc/edit?usp=sharing - Level notes (with exp requirements), Weapon list (all weapons and how to obtain), Required fights (with enemy defense, HP, weakness, EXP)
https://speedrun.com/boktai2/resources
Boktai 3
Routes
Some of these can be considered outdated and will eventually be replaced by guides on this website.
- Any%-related notes
https://docs.google.com/document/d/11CDzb9Ss-gR50daSSaA_NGhPLqy5Ogqfo3-PB5tD8jo - Any% route
https://docs.google.com/document/d/1dZtiI0aO_5cHPT6xlgU7hWk9C9NfR7yckyxqfoqprqc - Any% Bike races (items on the road, enemies, etc.)
https://docs.google.com/spreadsheets/d/1HenqqKYJk8HKJUv0pRe4DmxueIP76P_mrPuozt40--8 - Password for runs (with input order & effect)
https://speedrun.com/boktai3/guide/hdj25
Other
- Dungeon maps (by xDrHellx)
https://drive.google.com/drive/folders/1o8iN5ZwlMMVHuTO5ZniZ1R-jzyWrKi9Y?usp=sharing - English Translation patch
https://romhacking.net/translations/1331/ - Official Guidebook
https://archive.org/details/boktai3_guide
Lunar Knights
Routes
- Any% route (unfinished)
https://pastebin.com/hbXJ6s8K
Other
- Lunar Knights Action Replay Code Generator.
Made by “Darth Nemesis”, currently hosted by shenef.
https://boktai.shenef.one/LKAR.html
How to write Guides
These guides are written in Markdown using mdBook.
There are a couple good tutorials available such as markdowntutorial.com.
If you want to contribute directly, you can visit the repository on GitHub and submit changes by editing the files there and then submitting a Pull request.
Because of how mdBook works and the adjustments we made, many markdown previews won’t display correctly. But if you are following good practices and the examples here, it should display just fine on the final site.
If you run into any issues, don’t hesitate to ask in our Discord.
Below are a couple of examples on how to use the adjustments we made to mdBook for writing Boktai guides specifically.
Examples
Elemental colors
Used to mark the use of elements. For example on recommended Lenses or Enchantments.
Legible on the Dark themes but on the Light themes they are not exactly great.
- Sol
<span class="sol">Sol</span> - Luna
<span class="luna">Luna</span> - Dark
<span class="dark">Dark</span> - Flame
<span class="flame">Flame</span> - Frost
<span class="frost">Frost</span> - Earth
<span class="earth">Earth</span> - Cloud
<span class="cloud">Cloud</span>
Markers
Used to mark headers and strategies. Font color changes on hover.
- Safety / Backup strat
<span class="safety">Safety / Backup strat</span> - Trap
<span class="trap">Trap</span> - Mission
<span class="mission">Mission</span> - Boss fight
<span class="boss">Boss fight</span> - Purification
<span class="purification">Purification</span> - Puzzle
<span class="puzzle">Puzzle</span>
Embedded video files
Encoded using:
ffmpeg -i "input.mkv" -vf "scale=2*iw:2*ih:flags=neighbor" -c:v libvpx-vp9 -b:v 0 -crf 38 -row-mt 1 -deadline best -pix_fmt yuv420p -pass 1 -an -f null NUL &&
ffmpeg -i "input.mkv" -vf "scale=2*iw:2*ih:flags=neighbor" -c:v libvpx-vp9 -b:v 0 -crf 38 -row-mt 1 -deadline best -pix_fmt yuv420p -pass 2 -c:a libopus -b:a 96k "output.webm"
Slow to encode and higher quality than needed but videos in guides are never going to be long anyway.
Embedded using:
<video controls muted>
  <source src="./boktai/assets/video/test.webm" type="video/webm" />
</video>
YouTube, Twitch embeds
Make sure the URL is formatted like this:
- https://www.youtube.com/embed/uHMaErqqU_E
- https://player.twitch.tv/?video=2328442079&parent=shenef.github.io&autoplay=false
Set aspect-ratio to the aspect ratio of your video. Usually 16/9 but direct GBA exports are 3/2.
Title is not mandatory but it helps to identify the video when you don’t have a markdown preview.
Sadly the embed system of Twitch is terrible and the video will only load if the “parent” parameter in the URL is set and matches the page it’s embedded into. For local testing you’ll have to set that “parent” parameter to localhost.
YouTube:
<iframe
  style="aspect-ratio: 2/1"
  src="https://www.youtube.com/embed/uHMaErqqU_E"
  title="Boktai 1 28 Dungeons in 2:16:15"
  allowfullscreen
></iframe>
Twitch:
<iframe
  style="aspect-ratio: 16/9"
  src="https://player.twitch.tv/?video=2328442079&parent=shenef.github.io&autoplay=false"
  title="Boktai 1: Any% Normal 2 speedrun in 1:30:06"
  allowfullscreen
></iframe>
Interactive elements
You can use javascript within a book, which allows for some interactivity.
Below is a simple example but theoretically that allows for
- conditional Guides that show/hide strats based on user input
- inlined tools like calculators, RNG manip helpers, …
- etc.
Example:
Write something here:
Then press this
to show it as a popup.
Definition lists
Definition lists can be used for things like glossary entries. The term is listed on a line by itself, followed by one or more definitions. Each definition must begin with a : (after 0-2 spaces).
Example:
term A
  : This is a definition of term A. Text
    can span multiple lines.

term B
  : This is a definition of term B.
  : This has more than one definition.
This will render as:
- term A
- This is a definition of term A. Text can span multiple lines.
- term B
- This is a definition of term B.
- This has more than one definition.
Terms are clickable just like headers, which will set the browser’s URL to point directly to that term.
Admonitions
An admonition is a special type of callout or notice block used to highlight important information. It is written as a blockquote with a special tag on the first line.
> [!NOTE]
> General information or additional context.

> [!TIP]
> A helpful suggestion or best practice.

> [!IMPORTANT]
> Key information that shouldn't be missed.

> [!WARNING]
> Critical information that highlights a potential risk.

> [!CAUTION]
> Information about potential issues that require caution.
These will render as:
Note
General information or additional context.
Tip
A helpful suggestion or best practice.
Important
Key information that shouldn’t be missed.
Warning
Critical information that highlights a potential risk.
Caution
Information about potential issues that require caution.
This feature is enabled by default.
To disable it, see the [output.html.admonitions] config option.
Table of Contents
The table of contents doesn’t work correctly for level 5+ headers, so please avoid those.
ToC Level 4
Lorem ipsum dolor sit amet
ToC Level 5
The header is now smaller than the text and breaks the sidebar on the right.